Mock Q4: full solution and invented marking guide
All marking guidance is invented.
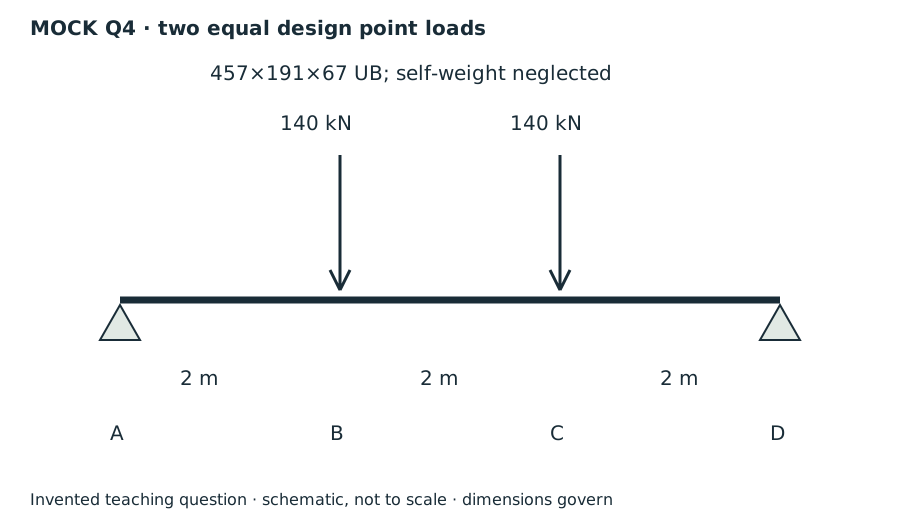
Invented mock-question diagram: two equal design point loads.
The UB has self-weight neglected; downward arrows at B and C each represent .
A–B, B–C and C–D are each .
A and D are vertical supports.
Schematic, not to scale; stated dimensions govern.Open full-size image.
(a) Equilibrium and diagrams
A cut reveals the internal actions
Find where the beam moment is largest. A large load arrow alone does not locate that point.
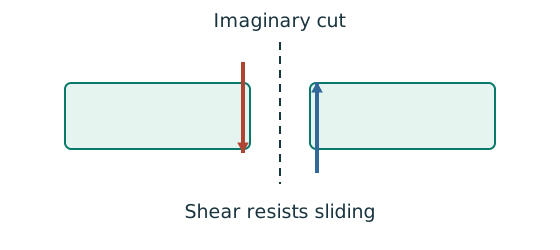
Prediction, then explanation. Under a uniform downward load, shear falls steadily. Moment reaches a stationary value where shear becomes zero.
Balance the forces on the cut piece to get V. Balance their moments about the cut to get M. Evaluate each load region separately.
x and L use m; w uses kN/m; V uses kN; M uses kN·m. These lines apply before any point load.
Scope. A point load adds a shear jump. A concentrated couple adds a moment jump. Check load points, supports and overhang roots too.
Check and takeaway. A UDL gives a sloping shear line and a curved moment line. A flat moment diagram therefore cannot represent a loaded UDL region.
Balance the isolated beam
Find the two vertical reactions before calculating internal shear or moment.
Prediction, then explanation. Move the same load toward B. Reaction B increases because the load has a larger moment arm about A.
Take moments about A. Reaction A has zero lever arm there. Then use vertical force balance to find reaction A.
P, RA and RB are forces in kN. L is support spacing and a is load position, both in m.
Scope. These expressions describe one point load on a simply supported beam. Add other loads through equilibrium; keep their actual positions.
Check and takeaway. Illustration: P = 60 kN, L = 6 m and a = 2 m give RB = 20 kN and RA = 40 kN.
Apply the reasoning to this section’s data and conditions
Physical interpretation: Why reactions balance the loads
Think of a seesaw that must neither fall nor turn.
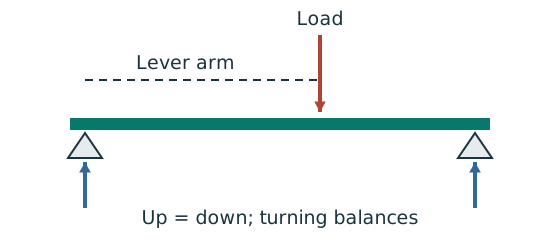
Sketch, not to scale; use the original dimensions.
- Upward and downward forces must balance.
- Take moments about a support to eliminate its reaction.
- Use perpendicular distance from the point to the force line.
Remember: A lateral restraint is not automatically a vertical support.
Segment AB ; segment BC ; segment CD , where is measured in .; end moments are zero.
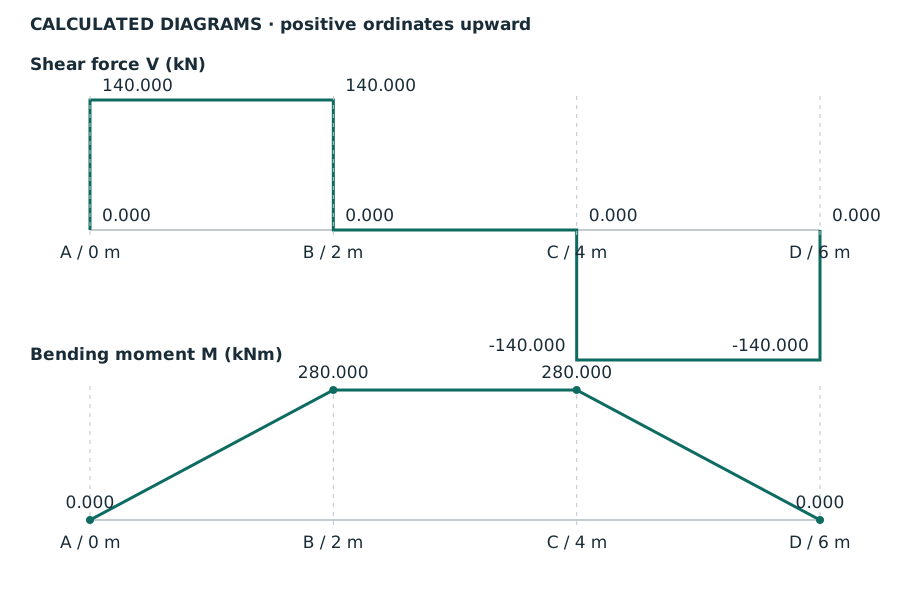
Teaching diagrams drawn from the calculation, not original source images.
Labels identify calculated diagrams, positive ordinates upwards, shear force and bending moment.
Positions are in , is measured in , is measured in ; A/B/C/D match the question diagram.
Numerical values are also given in the piecewise equations above.Open full-size image.
Mechanism detailsBuild the shear and moment diagrams
The complete mechanism is explained below.
Read each stage together with its stated conditions; playback and interaction are not required.
- For the illustrative 60 kN point load on a 6 m simply supported beam, balance the reactions before making a cut.
and before the point load.
Moment grows linearly.
Shear jumps down by P.
To its right, and .
For this case, moment is continuous and returns to zero at B.
A concentrated applied couple instead creates a moment jump.
(b) End-only lateral restraint
Vertical bending can trigger sideways motion
A beam has enough local bending resistance. Check whether its compression flange can move sideways and twist.
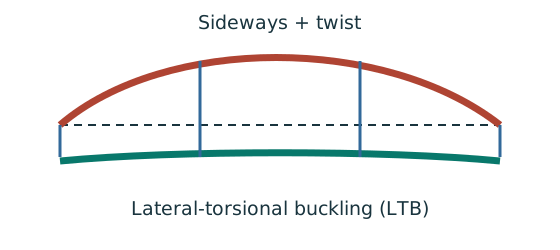
Prediction, then explanation. Adding a valid lateral restraint shortens a stability segment. It need not change the beam’s vertical reaction or moment diagram.
Identify the compressed flange and effective restraints. Calculate the specified slenderness, read buckling strength and compare resistance with the segment demand.
LE and ry use the same length unit. pb uses N/mm²; Sx uses mm³; Mb uses N·mm. mLT is dimensionless.
Scope. Use the specified section class, effective-length branch and loading condition. Load height alone does not prove a destabilizing case.
Check and takeaway. Removing a lateral restraint requires a new segment stability check. The old shorter-segment result cannot establish the longer segment’s adequacy.
Find which plate buckles first
Before using plastic bending resistance, check whether the flange and web can sustain the required stress distribution.
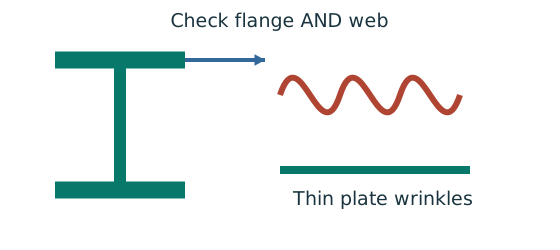
Prediction, then explanation. At fixed width, a thinner plate has a larger width-to-thickness ratio. Local buckling then becomes more restrictive.
Calculate the flange and web ratios separately. Compare each with the limits for its stress condition. The worse class governs.
py is the design yield strength in N/mm². ε is a dimensionless scale used in the supplied classification limits.
Scope. Pure bending and uniform compression use different web limits. Class 2 allows plastic resistance but not the Class 1 rotation capability.
Check and takeaway. A Class 1 web and Class 2 flange give a Class 2 section. Do not average the class numbers.
The web carries the shear check
Compare the applied shear with the resistance of the prescribed shear area.
Prediction, then explanation. At fixed design strength and depth, increasing web thickness increases this shear resistance.
Calculate the prescribed shear area. Multiply by the design shear stress from the course rule. Then compare matching force units.
D is overall depth; t is web thickness, in mm. Av uses mm². py uses N/mm², giving Vc in N.
Scope. Apply this area definition to the stated rolled section. Check web slenderness separately. The factor 0.6 is the low-shear threshold, not this resistance coefficient.
Check and takeaway. A shear pass alone does not prove bending, deflection or local support-web adequacy.
Apply the reasoning to this section’s data and conditions
Physical interpretation: A beam can escape sideways
The compressed flange can move sideways while the section twists.
Sketch, not to scale; use the original dimensions.
- Divide the beam at effective lateral restraints.
- Use each segment’s effective length to obtain its buckling resistance.
- Compare that resistance with the segment’s equivalent moment demand.
Remember: A section bending check alone does not check lateral-torsional buckling.
Lookup: Data File pp.9–10, exact UB row.
Dimensions on p.9; properties on p.10.
is overall depth.
is the clear web depth between root fillets, not the nominal designation.
| Property | Lookup value / conversion |
|---|---|
| Dimensions | D453.4, web t 8.5, flange T12.7, root r 10.2, clear d 407.6, all |
| Local ratios | ;。 |
| Major-axis properties | ; ; . |
| LTB properties | ; ; torsional index . |
Normal-load effective length is the given segment length.
All quantities in and λᴸᵀ are dimensionless.
This Class 1 section has .
Table 8.3a, Data File p.5, pᵧ355 column:
Mechanism detailsA beam bends sideways and twists
The complete mechanism is explained below.
Read each stage together with its stated conditions; playback and interaction are not required.
- For the illustrated sagging beam the top flange is compressed.
- The unrestrained compression flange can move sideways while the complete cross-section twists.
Only effective restraints divide the member into unbraced segments.
They do not automatically add vertical supports.
Use the segment effective length, section properties and matching moment factor.
This is an exaggerated mode shape, not a calculated displacement.
(c) Restraint at both loads
Use the same mechanism: Vertical bending can trigger sideways motion. Adding a valid lateral restraint shortens a stability segment. It need not change the beam’s vertical reaction or moment diagram.
Moment shape matters within one segment
Represent a nonuniform moment distribution in the applicable member-buckling equation.
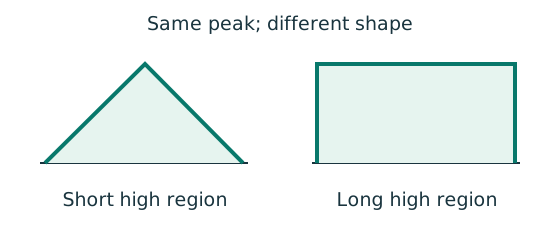
Prediction, then explanation. Two segments can have equal peak moment but different distributions. Their equivalent moment factors can therefore differ.
Evaluate moments from the true whole-beam analysis at the required positions. Apply the exact table’s weights, signs and lower bound.
mLT is an LTB factor. mx and my belong to the specified flexural checks. They are not interchangeable.
Scope. Some rules use magnitudes; others require signed ordinates. A factor does not reduce the actual moment used in a local section check.
Check and takeaway. Measure quarter points from the segment start, not automatically from the beam’s left support.
Move between two known values
The required slenderness lies between two table rows. Estimate the strength on the straight segment between those rows.
Prediction, then explanation. If the second strength is lower, moving toward that row must reduce the interpolated strength.
Subtract the lower input to find distance travelled. Divide by the input interval. Multiply that fraction by the output change.
x is the required input. The two known pairs are (x₀, y₀) and (x₁, y₁). f has no unit.
Scope. Use one table, curve and strength column. This interpolation does not permit extrapolation or inventing an intermediate steel section.
Check and takeaway. Illustration: between strengths 200 and 180, a fraction of 0.4 gives 192 N/mm². The result lies between both endpoints.
Apply the reasoning to this section’s data and conditions
Physical interpretation: Which length belongs in the calculation?
A sideways tie can shorten the buckling region without shortening the beam’s vertical span.
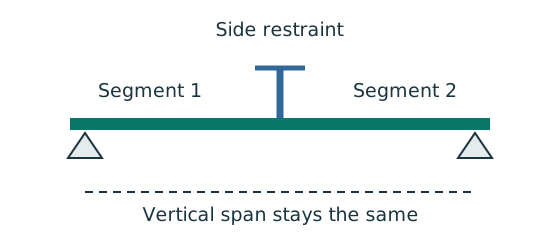
Sketch, not to scale; use the original dimensions.
- Separate vertical-support spacing from lateral-restraint spacing.
- Apply the course rule for the actual end restraint and loading.
- Keep the original vertical load analysis unless its supports change.
Remember: Restraints in one direction may not restrain the other direction.
Vertical supports remain A/D and the moment diagram is unchanged.
New LTB segments AB, BC and CD each have .
AB/CD moment diagrams are triangular, from increasing to or from decreasing to , giving .
BC moment is constant at , giving .
Segment resistances are equal, so BC governs.
Normal-load effective length is the given segment length.
All quantities in and λᴸᵀ are dimensionless.
This Class 1 section has .
Table 8.3a, Data File p.5, pᵧ355 column:
Since the governingBC demand passes andAB/CD are smaller with the same resistance, all three LTB segment checks pass.
The unchanged shear and section bending checks remain valid.
Mechanism detailsA beam bends sideways and twists
The complete mechanism is explained below.
Read each stage together with its stated conditions; playback and interaction are not required.
- For the illustrated sagging beam the top flange is compressed.
- The unrestrained compression flange can move sideways while the complete cross-section twists.
Only effective restraints divide the member into unbraced segments.
They do not automatically add vertical supports.
Use the segment effective length, section properties and matching moment factor.
This is an exaggerated mode shape, not a calculated displacement.
Compact script and invented marking guide
Use the same mechanism: Moment shape matters within one segment. Two segments can have equal peak moment but different distributions. Their equivalent moment factors can therefore differ.
Use the same mechanism: Vertical bending can trigger sideways motion. Adding a valid lateral restraint shortens a stability segment. It need not change the beam’s vertical reaction or moment diagram.
Use the same mechanism: A cut reveals the internal actions. Under a uniform downward load, shear falls steadily. Moment reaches a stationary value where shear becomes zero.
Apply the reasoning to this section’s data and conditions
; Mmax .
End-onlymLT0.925, equivalent demand :LTB fails despite section-strength passes.
WithB/C restraint eachLE2 m; AB/CD demand ,BC280 kNm, all pass against the common calculatedMb above.
Invented credit: (a) reactions , correctly labelledSFD/BMD2; (b) properties/class , shear/bending , moment factor , accurate LTB lookup/check ; (c) unchanged vertical analysis/segment lengths , all moment shapes , common resistance , conclusions .
Mechanism detailsRead the moment shape within one segment
The complete mechanism is explained below.
Read each stage together with its stated conditions; playback and interaction are not required.
- Moment ordinates must belong to the same effective unbraced segment.
- Same-side and reverse-curvature diagrams have different signed end ratios.
- The markers show ¼, ½ and ¾ of this segment, not of the entire beam.
LTB and column flexural factors are different.
Preserve their individual bounds and coefficient sets.