Foundations: understand the question before using a formula
1. Units, powers and the calculator Always examined
Simple explanation: Keep the units on the same scale
Changing units is like changing the ruler, not the object.
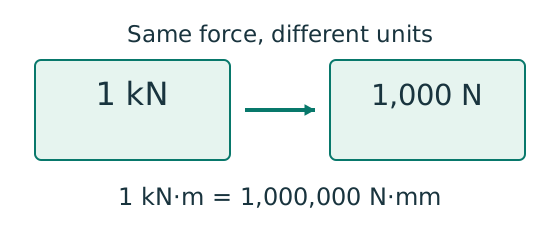
- ; .
- Area needs two length conversions; inertia needs four.
- Convert before substituting, then check the final unit.
Remember: A kN·m moment becomes 1,000,000 N·mm, not 1,000.
Force is a push or pull, measured in newtons (N); . Moment = force × perpendicular distance, in N·mm or kN·m. Stress = force ÷ area, in N/mm² (= MPa). Section properties (area, modulus, second moment) are geometry, not forces. The key to the conversions below: convert the length first, then square or cube it.
| Quantity | Conversion | Why the power matters |
|---|---|---|
| Length | ; | Convert length before squaring or cubing. |
| Area | 。 | |
| Section modulus | Used in moment capacity or . | |
| Second moment of area | Used in and deflection. | |
| Moment | 。 | |
| Line load | Both numerator and denominator divide by . | |
| Area load | Width converts a floor load into a beam load. |
Use kN and m for reactions and moments; switch to N and mm for stresses, strengths and deflections, because and are in N/mm². Write the conversion on the same line as the substitution.
Calculator tips: wrap the whole fraction in brackets under a square root, e.g. enter , not . A fourth root is the power 0.25. For go: → ×0.05 and +1 → fourth root → reciprocal. Keep at least four significant figures in between.
Try it yourself. Convert and into mm units.
Reveal answer and reasoning
。。
Animation labUnits and powers
Supplement to the original lesson. Enable JavaScript to play, step through calculations and rotate 3D models. The following explanation remains readable offline.
- Force, length and stress must use compatible units before substitution.
- . An area has two length factors, so .
- A section modulus has ; second moment of area has . Use and for cm to mm.
- . Divide by to express that moment in .
Animation labUnits and powers
Supplement to the original lesson. Enable JavaScript to play, step through calculations and rotate 3D models. The following explanation remains readable offline.
- Force, length and stress must use compatible units before substitution.
- . An area has two length factors, so .
- A section modulus has ; second moment of area has . Use and for cm to mm.
- . Divide by to express that moment in .
2. Rearranging and interpolating Always examined
Simple explanation: A value between two table rows
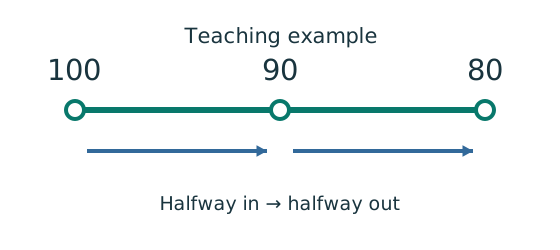
Move the same fraction of the way across both number ranges.
- Choose the correct table, curve and strength column first.
- Find how far your input lies between the two rows.
- Apply that fraction to the change between their answers.
Remember: Teaching example: halfway between outputs 100 and 80 gives 90.
An equation’s two sides are equal; whatever you do to one side, do to the other. For example, to find the area from , divide both sides by : . Compare capacity and demand in the same units.
To choose the number of bolts: , then round up. When checking a design, is over 1 — never round it to 1.00 and call it a pass.
Interpolation assumes a straight line between two table values and takes the value in proportion. First choose the right column (correct steel strength, correct curve), then interpolate between rows. If lies between and with table values and , the fraction is :
Made-up example (for practice only, not real table values): and ; find : , strength . Check: 192 lies between 180 and 200 ✓.
Try it yourself. Using that invented table, find the value at .
Reveal answer and reasoning
; strength . It lies between and .
Animation labInterpolate between two table rows
Supplement to the original lesson. Enable JavaScript to play, step through calculations and rotate 3D models. The following explanation remains readable offline.
- Select the correct curve, grade and strength column before choosing the two bracketing rows.
- . The slider shows the fraction between the two endpoints.
- . A decreasing table needs a negative change in y.
- The example uses illustrative outputs 100 and 80. At the result is 90; do not extrapolate missing rows.
Animation labRearrange a capacity equation
Supplement to the original lesson. Enable JavaScript to play, step through calculations and rotate 3D models. The following explanation remains readable offline.
- For , P is force, p is stress and A is area. Here we want A.
- Divide both sides by the same non-zero stress p.
- The p on the right cancels, leaving .
- gives . This is required area, not a selected section or a complete design check.
3. Load path and reactions Always examined
Simple explanation: Why reactions balance the loads
Think of a seesaw that must neither fall nor turn.
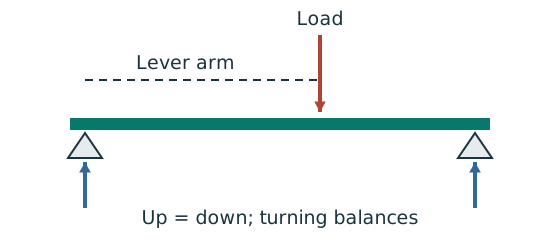
- Upward and downward forces must balance.
- Take moments about a support to eliminate its reaction.
- Use perpendicular distance from the point to the force line.
Remember: A lateral restraint is not automatically a vertical support.
A slab carries an area load and passes reactions to secondary beams; they pass reactions to main beams; main beams to columns; columns push down on the foundations. A beam-end reaction pushes up on that beam and pushes down, by the same amount, on the member supporting it. Do not draw both arrows on the same beam, or you count it twice.
A free-body diagram draws one member on its own and replaces its surroundings with support reactions. A pin stops movement but allows rotation; a roller gives one reaction at right angles to its surface; a fixed support also stops rotation and can provide a moment. A lateral restraint only stops the flange moving sideways; it is not a vertical support.
The course’s simply supported beam has a pin at one end and a roller at the other, carrying vertical loads. If the loading is symmetric, the two reactions are equal. If not, use the two equilibrium equations below (anticlockwise positive here; any consistent sign convention gives the same answer).
is the support spacing (m), a point load (kN), its distance from A (m), and a full-span uniform load (kN/m). For overall equilibrium a UDL can be replaced by a single force at its middle; but for the shear and moment at a point, keep it spread out.
The tributary width is the strip of slab whose load reaches a beam. For a one-way slab with equal beam spacing , an interior beam takes from each side, in total; an edge beam takes from one side. Check the slab span direction first; do not take a dimension as the tributary width just because it is the nearest number.
Try it yourself. Invented beam: ; a load at from A; over the full span. Find reactions.
Hint
Take moments about A so its unknown reaction has zero lever arm.
Reveal answer and reasoning
. . The two reactions sum to , equal to total downward load.
Animation labBalance reactions and moments
Supplement to the original lesson. Enable JavaScript to play, step through calculations and rotate 3D models. The following explanation remains readable offline.
- This demonstrator is a simply supported 6 m beam with a 60 kN point load; it is not the page’s original loading diagram.
- . Moving the load towards B increases .
- . The two upward reactions must sum to P.
- With the load at midspan, . End couples, UDLs and overhangs require their own equilibrium terms.
Animation labFollow the floor load in 3D
Supplement to the original lesson. Enable JavaScript to play, step through calculations and rotate 3D models. The following explanation remains readable offline.
- The floor carries pressure in . The highlighted strip belongs to one secondary beam.
- Multiply pressure by tributary width: . The illustration uses .
- A primary beam receives the secondary beam reaction at their connection, not a new full-span UDL.
- Trace reactions down to columns and foundations. Count each loaded area once.
4. Shear force, bending moment and deflection Always examined
Simple explanation: What shear is trying to do
Imagine cutting the beam: shear stops the two cut faces sliding past each other.
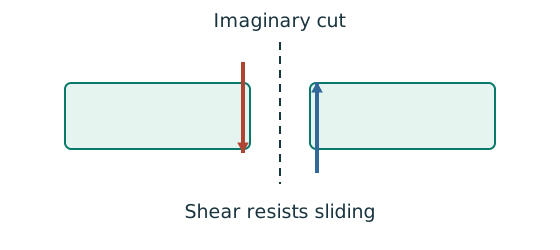
- Find the design shear from the load analysis.
- Use the section’s applicable shear area and strength.
- Compare demand with resistance in the same force units.
Remember: The web usually carries much of the vertical shear in an I-section.
Shear is the internal sideways force needed to keep either part of a cut beam in balance. Moment is the internal turning effect at the cut. Deflection is how far the beam has moved from where it started. At a cut from A (count only the loads left of the cut):
Under a UDL the shear diagram is a sloping straight line and the moment diagram a parabola. At a point load the shear jumps, while the moment is continuous with a sharp corner. An applied couple makes the moment diagram jump. Between point loads the maximum moment is where ; also check supports, load points and the roots of overhangs. The maximum moment is not always under a point load.
These shortcuts assume a simply supported beam and the stated load position; for an off-centre load or an overhang, use equilibrium. In the elastic range, results from different loads at the same position can be added (superposition); adding maxima from different positions does not generally give the true maximum.
For a simply supported beam of constant section (constant and ):
is the course Young’s modulus (how stiff the material is); is the second moment of area about the bending axis (how stiff the shape is), in mm⁴. The course deflection check normally uses the unfactored imposed load: load factors enlarge the demand for strength checks, not the beam’s stiffness.
Try it yourself. A simply supported beam has and . What are its maximum shear and moment?
Reveal answer and reasoning
. . The moment has one extra length factor, so it cannot have units .
Animation labBalance reactions and moments
Supplement to the original lesson. Enable JavaScript to play, step through calculations and rotate 3D models. The following explanation remains readable offline.
- This demonstrator is a simply supported 6 m beam with a 60 kN point load; it is not the page’s original loading diagram.
- . Moving the load towards B increases .
- . The two upward reactions must sum to P.
- With the load at midspan, . End couples, UDLs and overhangs require their own equilibrium terms.
Concept map: Load path: from the weight of the slab to the shear and moment diagrams
Concept map
Load path: from the weight of the slab to the shear and moment diagrams
Every calculation question starts on this route: area load → load per metre → reactions → shear → moment → compare with capacity. Where the maximum moment is, and how a reaction passes to the next member, are both on this map.
- Cause
- Key idea
- Result
- What changes it
- How design deals with it
- Exam answer
- marks are often lost here
Text version (from cause to result)
Cause
Area load (kN/m²)
The slab’s dead and imposed loads per square metre. For design they are factored: .
Comes from (upstream)— (a starting point)
Leads to (downstream) Load per metre of beam
What changes itWhere marks are lost
Tributary width
The strip of slab whose load reaches a beam. With equal spacing : an interior beam takes from each side, in total; an edge beam takes . Check the slab span direction first.
Comes from (upstream)— (a starting point)
Leads to (downstream) Load per metre of beam
Key idea
Load per metre of beam
Area load × tributary width gives the load along each metre of beam (kN/m), plus the beam’s self-weight.
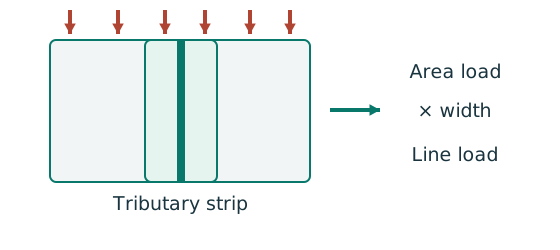
Comes from (upstream)Area load (kN/m²) Tributary width
Leads to (downstream), Reactions: take moments
Key idea
Free-body diagram: draw one beam on its own
Replace the surroundings with support reactions. A pin stops movement but allows rotation; a roller gives one reaction at right angles to its surface; a lateral restraint is not a vertical support.
Comes from (upstream)— (a starting point)
Leads to (downstream), Reactions: take moments
Key ideaWhere marks are lost
, Reactions: take moments
Take moments about one support for the other reaction, then use vertical equilibrium. For overall equilibrium a UDL can be replaced by one force at its middle.
Formula
Comes from (upstream) Load per metre of beamFree-body diagram: draw one beam on its own
Leads to (downstream) Shear-force diagramA reaction becomes the next member’s load
Key idea
Shear-force diagram
Cut the beam anywhere: the sum of all forces left of the cut is the shear. It jumps at a point load and slopes under a UDL.
Comes from (upstream), Reactions: take moments
Leads to (downstream) Bending-moment diagramShear changes sign → maximum momentDemand ≤ capacity
Key ideaWhere marks are lost
Bending-moment diagram
Moments about the cut of all forces to its left. The change in moment = the area under the shear diagram: a parabola under a UDL, a sharp corner at a point load.
Comes from (upstream) Shear-force diagram
Leads to (downstream)Shear changes sign → maximum moment
ResultWhere marks are lost
Shear changes sign → maximum moment
Because the moment is the running area under the shear, it stops growing where the shear is zero (changes sign) — that is the maximum. Also check supports, load points and the root of any overhang.
Comes from (upstream) Shear-force diagram Bending-moment diagram
Leads to (downstream)Demand ≤ capacity
How design deals with itWhere marks are lost
A reaction becomes the next member’s load
A beam-end reaction pushes up on that beam and down, by the same amount, on the member below: slab → secondary beam → main beam → column → foundation.
Comes from (upstream), Reactions: take moments
Leads to (downstream)Exam: label every value
How design deals with it
Demand ≤ capacity
The largest shear and moment are the “demand”, compared with and (or for LTB). Worked numbers: floor-beam map.
Comes from (upstream) Shear-force diagramShear changes sign → maximum moment
Leads to (downstream)Exam: label every value
Exam answer
Exam: label every value
Label the shear on both sides of every load point and the moment at every load point and the maximum; show the check. The first 7 marks of the LTB question are here.
Comes from (upstream)Demand ≤ capacityA reaction becomes the next member’s load
Leads to (downstream)— (the last step)
Tour steps
1. From area load to load per metre
Area load × tributary width → load per metre (plus self-weight).
In this stepArea load (kN/m²) Tributary width Load per metre of beam
2. Draw one beam, find the reactions
The free-body diagram shows only support reactions; take moments, then check the sum.
In this stepFree-body diagram: draw one beam on its own, Reactions: take moments
3. Shear and moment
Shear = forces left of the cut; moment = area under the shear diagram.
In this step Shear-force diagram Bending-moment diagramShear changes sign → maximum moment
4. The load keeps travelling down
This beam’s reaction is the load the next member receives.
In this stepA reaction becomes the next member’s load
5. Check it and write it up
Compare the largest and with the capacities; label every point on the diagrams.
In this stepDemand ≤ capacityExam: label every value
Animation labBuild the shear and moment diagrams
Supplement to the original lesson. Enable JavaScript to play, step through calculations and rotate 3D models. The following explanation remains readable offline.
- For the illustrative 60 kN point load on a 6 m simply supported beam, balance the reactions before making a cut.
- and before the point load. Moment grows linearly.
- Shear jumps down by P. To its right, and .
- For this case, moment is continuous and returns to zero at B. A concentrated applied couple instead creates a moment jump.
5. Steel: strength, stiffness and ductility Background
Source: Chapter 1 pp. 2–3; L1 slides 3 and 10.Steel is mostly iron (about 98%) with small additions: carbon up to 0.25%, manganese up to 1.6%, silicon 0.1–0.5%, sulphur and phosphorus up to 0.05% each. More carbon raises strength but lowers ductility and weldability, which is why structural steel limits its carbon content.
Yield strength: the stress at which noticeable permanent deformation starts. Stiffness: resistance to elastic deformation — a higher steel grade does not give a higher . Ductility: the ability to deform a lot before breaking. Weldability: whether good welded joints can be made with suitable procedures. A beam can be strong enough and still sag too much.
The course uses S275, S355 and S460 (European grades); Chinese grades are Q235, Q345, Q390 and Q420. The grade name is not automatically the design strength for every thickness; read the table by thickness (section 18).
Animation labElasticity, yielding and ductility
Supplement to the original lesson. Enable JavaScript to play, step through calculations and rotate 3D models. The following explanation remains readable offline.
- Stress is force divided by area. Strain measures change in length relative to original length.
- Before yielding, stress is approximately . E controls the elastic slope.
- Further strain includes permanent deformation. Higher yield strength does not by itself increase E.
- Strength, stiffness and ductility answer different questions. This schematic is not a measured stress–strain curve.
6. Fatigue: repeated loading slowly grows cracks Background
Source: Chapter 1 pp. 2 and 14.Fatigue is failure by cracks growing step by step under repeated changes of stress. Typical examples are crane girders and bridges. It is different from one overload: loads that each look harmless can still grow a crack when repeated many times. Avoid sudden changes of section and stress concentrations. Ordinary wind fluctuations usually do not need a fatigue design unless there are very many stress cycles.
Model answer: “Fatigue is failure caused by progressive crack growth under fluctuating stress. Avoid abrupt section changes and stress concentrations, and detail welded connections appropriately.”
Animation labRepeated loading grows a crack
Supplement to the original lesson. Enable JavaScript to play, step through calculations and rotate 3D models. The following explanation remains readable offline.
- A notch or abrupt detail can concentrate stress near the connection.
- Many load cycles can initiate a crack even when one application does not cause static failure.
- The illustrative crack length increases with the animation stages. It is not a fatigue-life calculation.
- Use the specified fatigue method and detail category. Avoid abrupt changes and identify whether repeated loading is relevant.
7. Corrosion protection (theory question) Often examined
Source: Chapter 1 p.2.Corrosion removes steel and makes the effective section thinner. Paint and metallic coatings separate the steel from its environment; zinc or aluminium coatings improve resistance to corrosion and abrasion. Structures permanently in water can use cathodic protection. Weathering steel forms a protective oxide layer because of its alloy content — it is a choice of steel, not a paint.
Model answer (two methods): “Apply a protective paint or zinc coating to isolate the steel from corrosive exposure. For continuously immersed structures, use cathodic protection to reduce electrochemical corrosion.” Give two methods that work differently, each with a short reason.
Concept map: Corrosion protection: why steel rusts, and the two ways to stop it
Concept map
Corrosion protection: why steel rusts, and the two ways to stop it
The question asks for two methods. The key is that they must work differently: one keeps water and air away, the other lets another metal corrode instead of the steel.
- Cause
- Key idea
- Result
- How design deals with it
- Exam answer
- marks are often lost here
Text version (from cause to result)
Cause
Moisture + oxygen
Steel is exposed to damp air or water.
Comes from (upstream)— (a starting point)
Leads to (downstream)Electrochemical corrosion: rust
Key idea
Electrochemical corrosion: rust
The iron in the steel reacts electrochemically with water and oxygen and slowly turns into rust.
Comes from (upstream)Moisture + oxygen
Leads to (downstream)Thinner section, less strength
Result
Thinner section, less strength
Rust eats the steel away; the effective section gets thinner and weaker, and durability suffers (a serviceability limit state, SLS).
Comes from (upstream)Electrochemical corrosion: rust
Leads to (downstream)Two ideas: barrier / sacrifice
Key idea
Two ideas: barrier / sacrifice
(1) Barrier: keep water and air away from the steel; (2) sacrifice: let another metal (e.g. zinc) corrode instead of the steel.
Comes from (upstream)Thinner section, less strength
Leads to (downstream)Paint coating (barrier)Hot-dip galvanizing (barrier + sacrifice)Cathodic protection (immersed)Weathering steel (material choice)
How design deals with it
Paint coating (barrier)
A paint system forms a barrier on the surface that keeps out moisture and oxygen.
Comes from (upstream)Two ideas: barrier / sacrifice
Leads to (downstream)Exam: two methods that work differently
How design deals with it
Hot-dip galvanizing (barrier + sacrifice)
The zinc layer both isolates the steel and corrodes first, sacrificing itself to protect the steel.
Comes from (upstream)Two ideas: barrier / sacrifice
Leads to (downstream)Exam: two methods that work differently
How design deals with it
Cathodic protection (immersed)
For structures permanently in water; it reduces electrochemical corrosion.
Comes from (upstream)Two ideas: barrier / sacrifice
Leads to (downstream)Exam: two methods that work differently
How design deals with it
Weathering steel (material choice)
Its alloy content forms a stable protective oxide layer. It is a choice of steel, not a coating.
Comes from (upstream)Two ideas: barrier / sacrifice
Leads to (downstream)Exam: two methods that work differently
Exam answerWhere marks are lost
Exam: two methods that work differently
One line each on how it protects. The safest pair: paint (barrier) + galvanizing (sacrifice), or add cathodic protection.
Comes from (upstream)Paint coating (barrier)Hot-dip galvanizing (barrier + sacrifice)Cathodic protection (immersed)Weathering steel (material choice)
Leads to (downstream)— (the last step)
Tour steps
1. Why does steel rust?
Moisture + oxygen → electrochemical reaction → rust → a thinner section.
In this stepMoisture + oxygenElectrochemical corrosion: rustThinner section, less strength
2. Two ideas
Cut off the cause (keep water and air out), or find a stand-in (a sacrificial metal).
In this stepTwo ideas: barrier / sacrifice
3. Four methods
Paint, galvanizing, cathodic protection, weathering steel — which idea does each belong to?
In this stepPaint coating (barrier)Hot-dip galvanizing (barrier + sacrifice)Cathodic protection (immersed)Weathering steel (material choice)
4. The exam answer
Pick two methods that work differently and give one line each on how they protect.
In this stepExam: two methods that work differently
Animation labHow corrosion protection works
Supplement to the original lesson. Enable JavaScript to play, step through calculations and rotate 3D models. The following explanation remains readable offline.
- Corrosion can consume steel and reduce its effective thickness.
- Paint and metallic coatings protect the exposed surface; coating integrity matters.
- Edges, damaged coatings and water-trapping details deserve attention. The model shows layers schematically.
- Weathering steel and cathodic protection have specific environmental applications; they are not universal substitutes for paint.
8. Fire protection: learn this sketch (theory question) Always examined
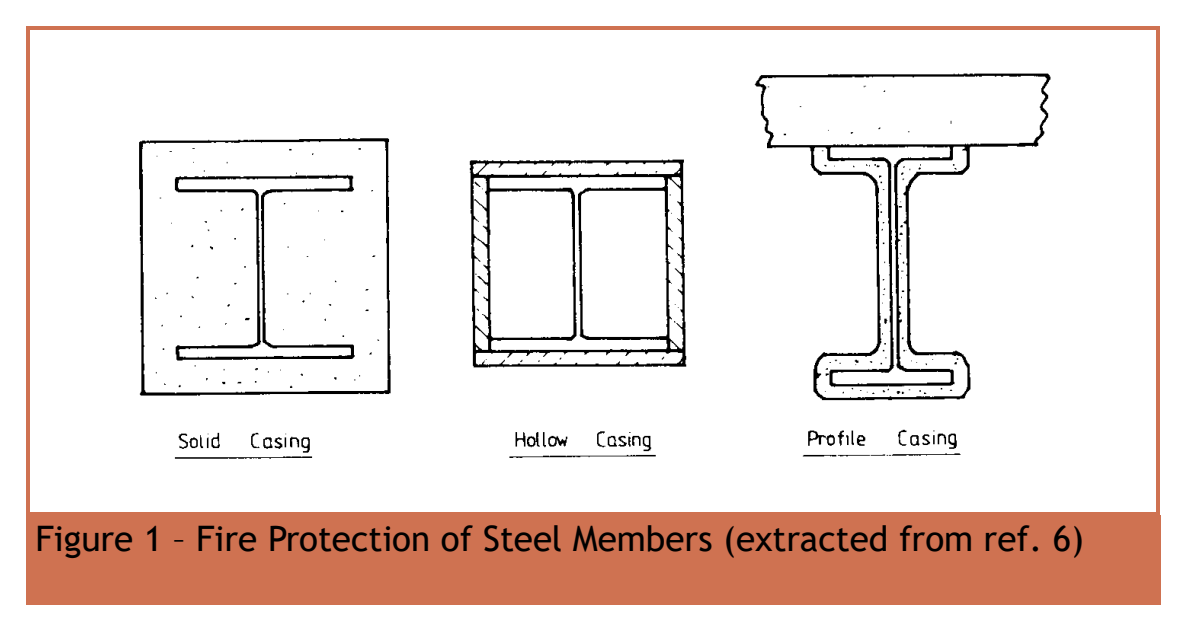
Source: Chapter 1 p.3.Steel loses strength as it heats up; fire protection delays the heating of the load-bearing steel. In the figure above: solid casing — the rectangle around the I-section is completely filled; hollow casing — a box around it with air inside; profile casing — a layer following the steel outline. In your answer, draw the I-section clearly inside each outline and label it. The lecture gives no thickness or fire rating, so do not add numbers.
Try it yourself. Does a hollow fire-protection casing mean the structural steel member itself must be a hollow section?
Reveal answer and reasoning
No. The source figure shows an I section inside a hollow protective enclosure. Distinguish the steel shape from the protection shape.
Concept map: Fire protection: why wrap the steel, and how to sketch the three methods
Concept map
Fire protection: why wrap the steel, and how to sketch the three methods
The most frequent theory question (4 times in 16 papers). Understand the cause — steel softens when hot — and the three methods become three ways of doing the same thing: insulation.
- Cause
- Key idea
- Result
- How design deals with it
- Exam answer
- marks are often lost here
Text version (from cause to result)
Cause
A fire heats the steel
Steel conducts heat well, so it heats up quickly in a fire.
Comes from (upstream)— (a starting point)
Leads to (downstream)Steel softens: strength and stiffness drop
Key idea
Steel softens: strength and stiffness drop
The hotter the steel, the lower its strength and stiffness. At a critical temperature the member can no longer carry its load.
Comes from (upstream)A fire heats the steel
Leads to (downstream)Members fail → collapse, less time to escape
Result
Members fail → collapse, less time to escape
Beams and columns fail early; the structure may collapse before people can get out.
Comes from (upstream)Steel softens: strength and stiffness drop
Leads to (downstream)The principle: insulate to delay heating
How design deals with it
The principle: insulate to delay heating
Fire protection does not stop the steel heating; it gives it an insulating coat that delays it reaching the critical temperature, buying time.
Comes from (upstream)Members fail → collapse, less time to escape
Leads to (downstream)Solid casingHollow casingProfile casing
How design deals with it
Solid casing
The whole I-section is encased in solid material, e.g. concrete. Sketch: the I-section inside a filled (hatched) rectangle.
Comes from (upstream)The principle: insulate to delay heating
Leads to (downstream)Exam: one-line principle + sketch two
How design deals with itWhere marks are lost
Hollow casing
Fire boards form a box around the I-section with an air space inside. Sketch: the I-section inside a rectangular outline.
Comes from (upstream)The principle: insulate to delay heating
Leads to (downstream)Exam: one-line principle + sketch two
How design deals with it
Profile casing
A sprayed coating or intumescent paint forms a thin layer following the I shape. Sketch: a thin layer drawn around the I outline.
Comes from (upstream)The principle: insulate to delay heating
Leads to (downstream)Exam: one-line principle + sketch two
Exam answerWhere marks are lost
Exam: one-line principle + sketch two
Write the principle in one line, then sketch two methods. Draw the I-section in every sketch and label it. The lecture gives no thickness or fire rating, so do not invent numbers.
Comes from (upstream)Solid casingHollow casingProfile casing
Leads to (downstream)— (the last step)
Tour steps
1. Why protect against fire?
Fire → steel heats up → strength and stiffness drop → members fail.
In this stepA fire heats the steelSteel softens: strength and stiffness dropMembers fail → collapse, less time to escape
2. One principle: insulation
The aim is to delay the steel heating, buying time for escape and fire-fighting.
In this stepThe principle: insulate to delay heating
3. Three ways to do it
Solid (filled), hollow (an outline), profile (a thin layer following the shape). The difference is all in the outline you draw.
In this stepSolid casingHollow casingProfile casing
4. The exam answer
One line of principle + two labelled sketches is the skeleton of a full-mark answer.
In this stepExam: one-line principle + sketch two
Animation labSee the fire-protection enclosure
Supplement to the original lesson. Enable JavaScript to play, step through calculations and rotate 3D models. The following explanation remains readable offline.
- Steel loses strength as it heats. Protection aims to delay heat reaching the section.
- Solid casing fills the enclosure around the I-section.
- A hollow enclosure surrounds the section while leaving an air space.
- Profile casing follows the section outline. The supplied sketch does not determine protection thickness or fire duration.
9. Section shapes, axes and names (theory question) Often examined
Simple explanation: Why I, Z and S are different
The same section has different numbers for different jobs.
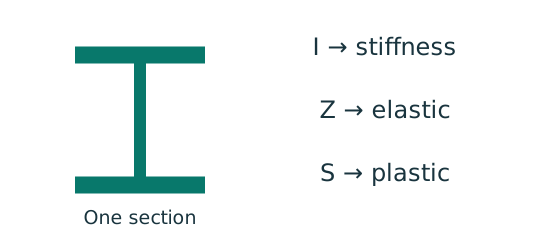
- I describes how area is spread: it affects elastic stiffness.
- Z is the elastic section modulus; S is the plastic section modulus.
- Choose the property, axis and units required by the formula.
Remember: Do not substitute S for Z merely because it is larger.
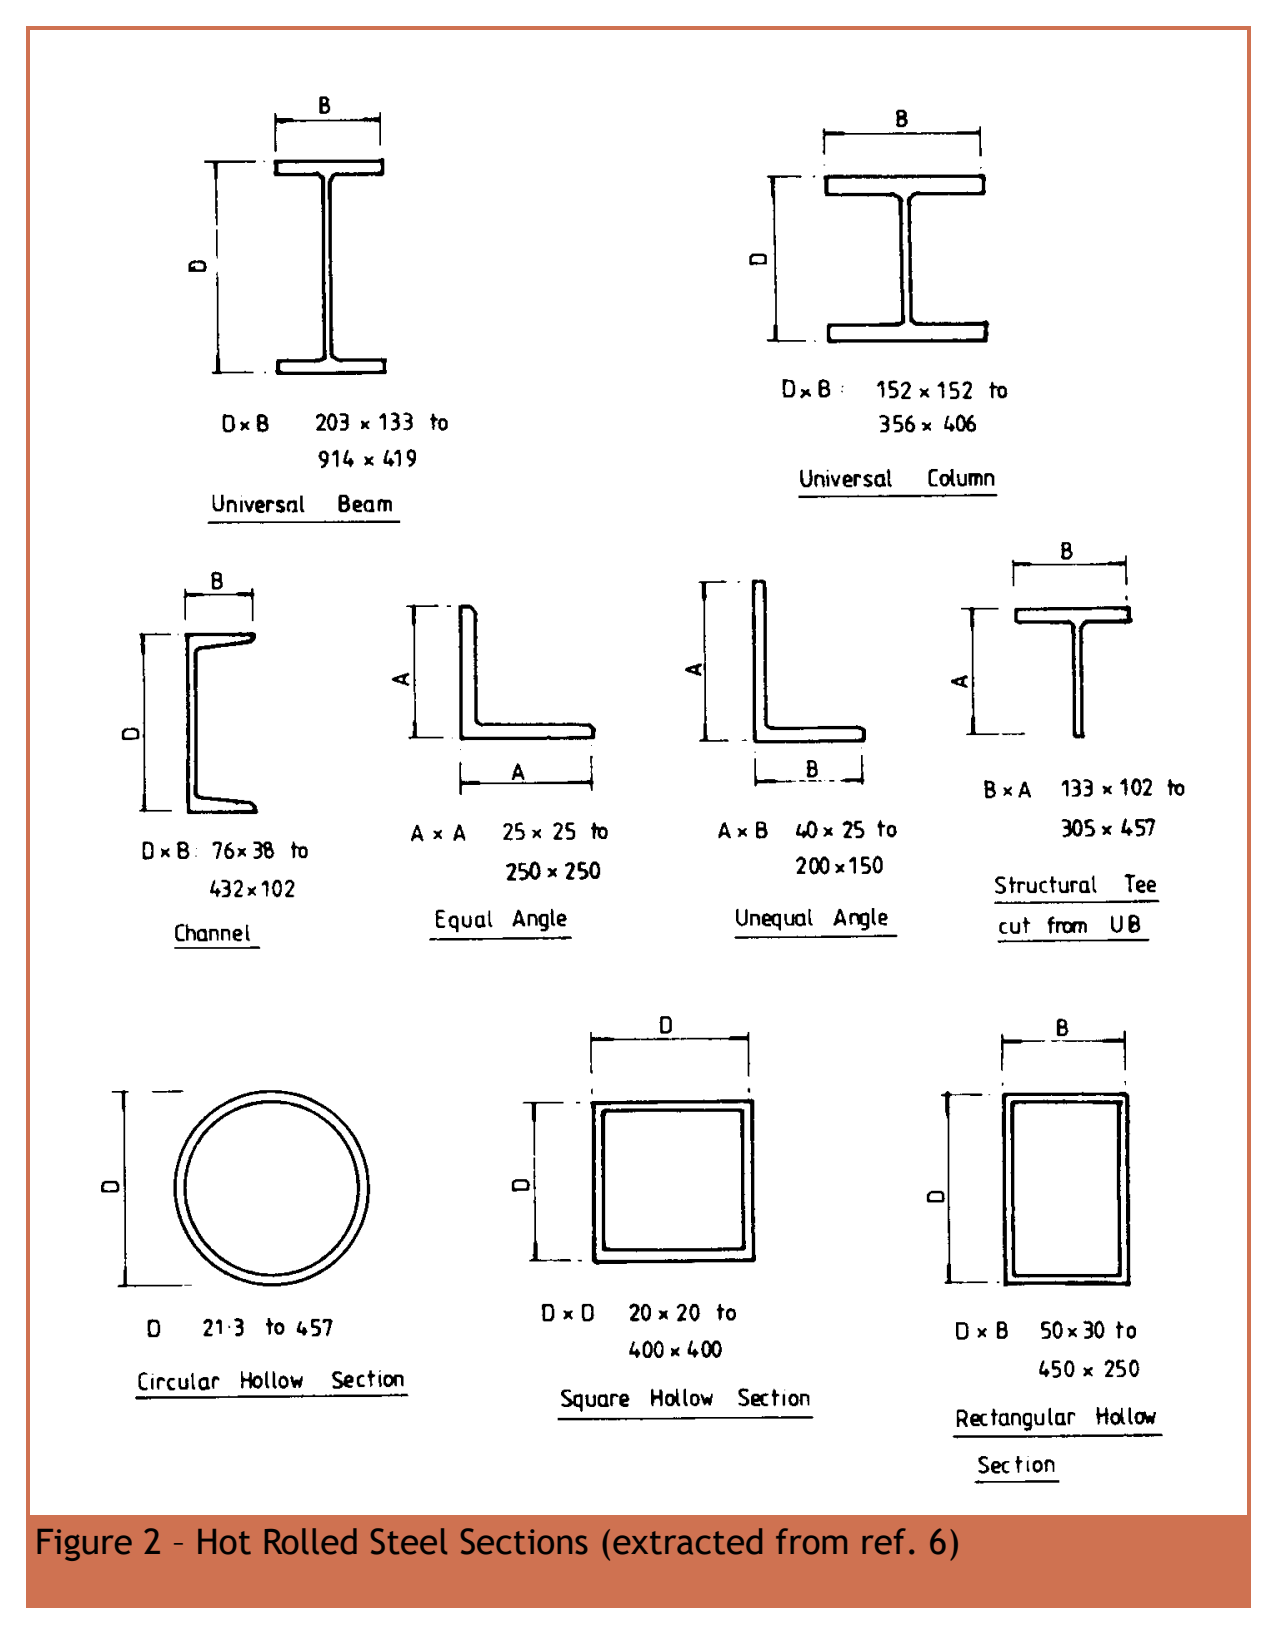
A UB (universal beam) is deep and efficient in bending about its strong axis; a UC (universal column) has wider flanges, suited to compression and bending both ways. Channels and angles are used in bracing, trusses and compound members; a tee can be cut from a UB or UC. CHS, SHS and RHS are circular, square and rectangular hollow sections. In this course is the strong axis and the weak axis.
A name such as 356×127×39 UB means roughly 356 mm deep, 127 mm wide and 39 kg per metre. These are nominal; read the real dimensions from the same table row. Self-weight: (with ).
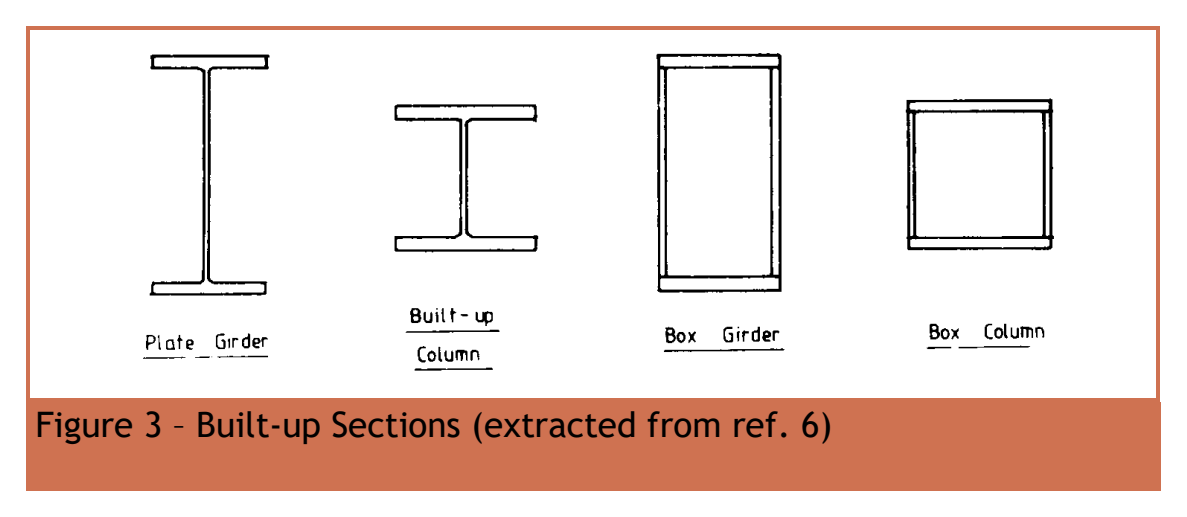
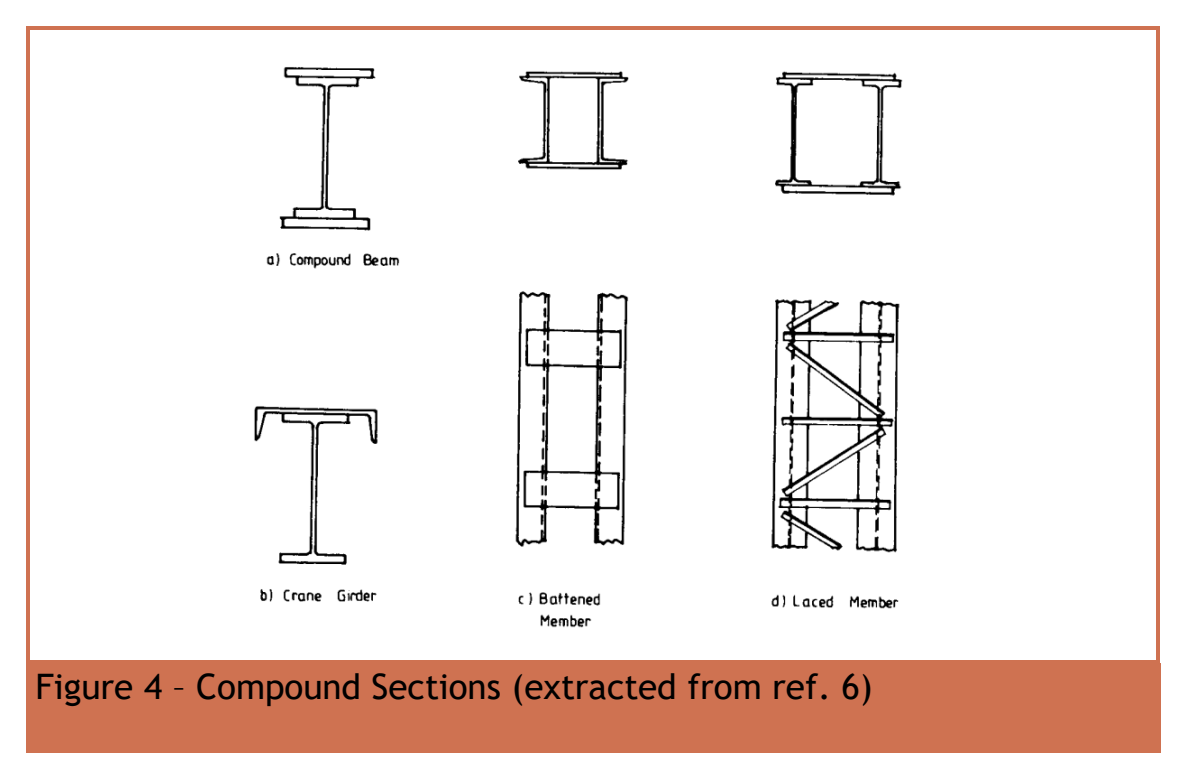
Built-up sections are plates welded into an I, H or box. In a sketch, show the separate web and flange plates and mark the welds. Compound sections combine rolled sections or add cover plates — e.g. strengthened beams, crane girders, battened and laced columns.
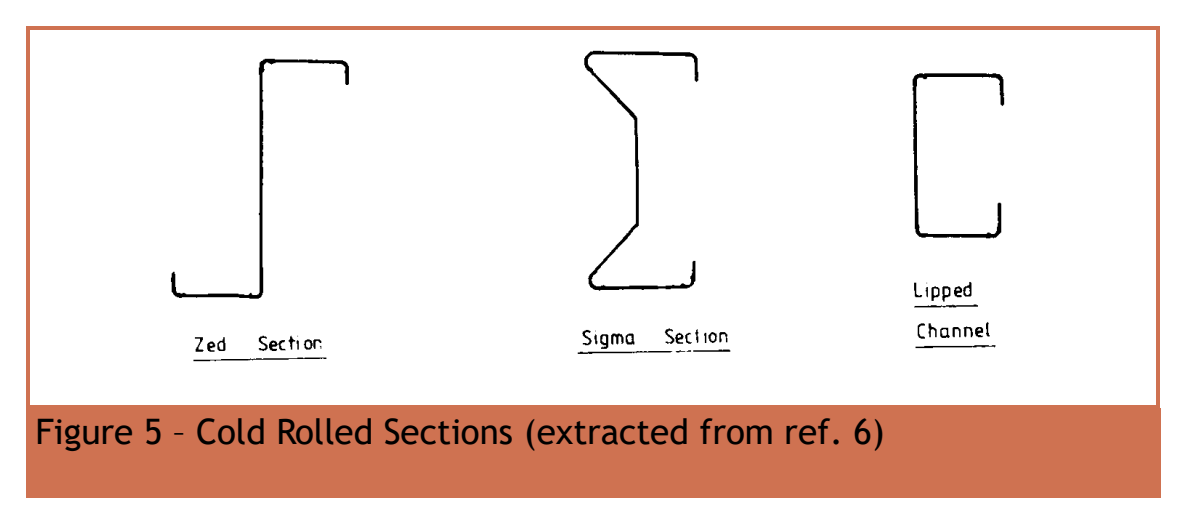
Cold-formed sections are bent from thin sheet and are often used as purlins and sheeting rails; do not apply UB formulas to these thin-walled shapes. If the exam asks for four hot-rolled sections, UB, UC, channel and angle are the safest choice.
Concept map: Hot-rolled sections: the shape decides the job
Concept map
Hot-rolled sections: the shape decides the job
The theory question “sketch and name four hot-rolled sections” has been asked twice. Once you see where the steel sits, it is clear why a UB is a beam and a UC a column — and how links to LTB and column buckling.
- Cause
- Key idea
- Result
- What changes it
- Exam answer
- marks are often lost here
Text version (from cause to result)
Cause
Steel far from the axis works hardest
In bending, steel far from the neutral axis carries the most stress with the longest lever arm. That is why an I shape puts most of its steel in the flanges.
Comes from (upstream)— (a starting point)
Leads to (downstream), , , Section properties come from the shape
Key idea
, , , Section properties come from the shape
governs stiffness (deflection), the elastic moment, the plastic moment, and buckling. They are not interchangeable.
Comes from (upstream)Steel far from the axis works hardest
Leads to (downstream)Strong axis x–x, weak axis y–yChannelAngle
Key idea
Strong axis x–x, weak axis y–y
For the same section and about are far larger than about . In this course is always the strong axis.
Comes from (upstream), , , Section properties come from the shape
Leads to (downstream)UB: deep and narrow → beamsUC: wide flanges, width ≈ depth → columns
What changes it
How to read a section name
356×127×39 UB: about 356 mm deep, 127 mm wide, 39 kg per metre (self-weight ). These are nominal; read the real dimensions from the table row.
Comes from (upstream)— (a starting point)
Leads to (downstream)UB: deep and narrow → beams
Result
UB: deep and narrow → beams
Very efficient in strong-axis bending; but the narrow flanges give a small , so it is prone to LTB and needs lateral restraint (see the LTB concept map).
Comes from (upstream)Strong axis x–x, weak axis y–yHow to read a section name
Leads to (downstream)Exam: sketch and name four
Result
UC: wide flanges, width ≈ depth → columns
Stocky in both directions, so is not too small — suited to compression and bending both ways (see the column-buckling map).
Comes from (upstream)Strong axis x–x, weak axis y–y
Leads to (downstream)Exam: sketch and name four
Result
Channel
“[” shape: one web with both flanges on the same side. Used for bracing, secondary members and compound sections.
Comes from (upstream), , , Section properties come from the shape
Leads to (downstream)Exam: sketch and name four
Result
Angle
“L” shape with equal or unequal legs. Used in bracing, trusses and connection pieces. Connected through one leg it needs a deduction (see the net-area map).
Comes from (upstream), , , Section properties come from the shape
Leads to (downstream)Exam: sketch and name four
Exam answerWhere marks are lost
Exam: sketch and name four
The safest four: UB, UC, channel and angle. Sketch each cross-section, label it and give one line on its use.
Comes from (upstream)UB: deep and narrow → beamsUC: wide flanges, width ≈ depth → columnsChannelAngle
Leads to (downstream)— (the last step)
Tour steps
1. Where the steel sits
The further from the axis the more useful, so the shape sets .
In this stepSteel far from the axis works hardest, , , Section properties come from the shape
2. Strong and weak axes
Strong about , weak about — that is what separates beams from columns.
In this stepStrong axis x–x, weak axis y–y
3. UB for beams, UC for columns
A UB is deep and narrow — efficient in bending but with a small ; a UC is stocky both ways.
In this stepHow to read a section nameUB: deep and narrow → beamsUC: wide flanges, width ≈ depth → columns
4. Channels and angles
Mostly for bracing, trusses and connections.
5. The exam answer
Four labelled sketches, one line of use each.
In this stepExam: sketch and name four
Animation labExplore section geometry and axes
Supplement to the original lesson. Enable JavaScript to play, step through calculations and rotate 3D models. The following explanation remains readable offline.
- The flanges are the wide plates; the web connects them. Rotate the I-section to see both.
- The same section has different stiffness and resistance about its two principal axes.
- I controls elastic curvature; is elastic section modulus. Plastic modulus S comes from plastic stress blocks.
- Nominal section labels are not every actual dimension. Keep the row, axis and units together.
10. Limit states: ULS and SLS Often examined
Simple explanation: Strong enough and stiff enough are two questions
A shelf can avoid breaking yet still sag too much.
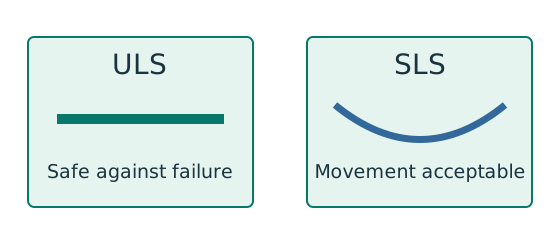
- ULS checks safety against the relevant failure modes.
- SLS checks the specified everyday-use limit.
- Use the load case required for each check.
Remember: Passing bending resistance does not prove deflection passes.
Source: Chapter 1 p.7, Table 2.1 extract.A limit state is a condition beyond which the structure no longer meets a requirement. ULS is about collapse or damage that cannot be repaired: yielding, rupture, buckling, mechanism, overturning, sliding, uplift, fire, brittle fracture, fatigue. SLS is about use: excessive deflection, vibration, wind-induced oscillation and durability.
The design process: characteristic loads × load factors → work out their effects → compare with design resistance. Imposed load gets a bigger factor (1.6) because it is less predictable. The material safety margin is already inside the course design strengths, so do not apply an extra Eurocode material factor.
Try it yourself. A beam has adequate strength but cracks its plaster finish through excessive movement. Which check has failed?
Reveal answer and reasoning
Serviceability, specifically deflection. Passing ULS does not establish SLS adequacy.
Concept map: Limit states: “will it collapse?” and “does it work?” are two different routes
Concept map
Limit states: “will it collapse?” and “does it work?” are two different routes
ULS and SLS are not only a theory question (asked twice); they decide which load each calculation uses: strength with factored loads, deflection with unfactored loads. This map links the two.
- Cause
- Key idea
- Result
- How design deals with it
- Exam answer
- marks are often lost here
Text version (from cause to result)
Cause
Limit state
A condition beyond which the structure no longer meets a design requirement. Design makes sure none of them is reached.
Comes from (upstream)— (a starting point)
Leads to (downstream)ULS: will it collapse?SLS: does it work in everyday use?
Key idea
ULS: will it collapse?
Ultimate limit state: safety — collapse or damage that cannot be repaired.
Comes from (upstream)Limit state
Leads to (downstream)ULS examples ULS uses factored loads
Key idea
SLS: does it work in everyday use?
Serviceability limit state: it does not collapse, but it does not work properly in normal use.
Comes from (upstream)Limit state
Leads to (downstream)SLS examples SLS uses unfactored loads
Result
ULS examples
Bending or shear failure of a beam (yielding), column buckling, overturning or sliding, brittle fracture, fatigue, fire.
Comes from (upstream)ULS: will it collapse?
Leads to (downstream)Theory question: definition + two examples each
Result
SLS examples
Excessive deflection cracking finishes, vibration causing discomfort, wind-induced oscillation, durability (e.g. corrosion).
Comes from (upstream)SLS: does it work in everyday use?
Leads to (downstream)Theory question: definition + two examples each
How design deals with itWhere marks are lost
ULS uses factored loads
Characteristic loads × load factors, compared with the design resistance. Imposed load is less predictable, so its factor is larger (1.6). The material safety margin is already inside the course design strength — do not apply another.
Comes from (upstream)ULS: will it collapse?
Leads to (downstream)The floor-beam question tests both
How design deals with itWhere marks are lost
SLS uses unfactored loads
Deflection looks at the real everyday load: imposed load only, unfactored, compared with a limit ( with brittle finishes).
Comes from (upstream)SLS: does it work in everyday use?
Leads to (downstream)The floor-beam question tests both
Exam answer
The floor-beam question tests both
Shear and bending checks = ULS (factored); the deflection check = SLS (unfactored). Both routes run side by side in one question — see the floor-beam map.
Comes from (upstream) ULS uses factored loads SLS uses unfactored loads
Leads to (downstream)— (the last step)
Exam answer
Theory question: definition + two examples each
One definition, then two examples each of ULS and SLS.
Comes from (upstream)ULS examplesSLS examples
Leads to (downstream)— (the last step)
Tour steps
1. Two questions
ULS asks “will it collapse?”; SLS asks “does it work normally?”.
In this stepLimit stateULS: will it collapse?SLS: does it work in everyday use?
2. Examples of each
Collapse, fracture and buckling are ULS; too much deflection, vibration or rust are SLS.
In this stepULS examplesSLS examples
3. The two routes use different loads
ULS: ; SLS: the real imposed load , unfactored.
In this step ULS uses factored loads SLS uses unfactored loads
4. Calculation and theory
The floor-beam question uses both routes; the theory question needs a definition + two examples each.
In this stepThe floor-beam question tests bothTheory question: definition + two examples each
Animation labTwo different design questions
Supplement to the original lesson. Enable JavaScript to play, step through calculations and rotate 3D models. The following explanation remains readable offline.
- ULS compares factored actions with the applicable resistance to yielding, rupture or instability.
- SLS checks movement, vibration or another specified use requirement.
- A beam can be strong enough but deflect too much. The two checks need their own loads and denominators.
- A resistance pass cannot stand in for a serviceability pass. Complete all requested checks.
11. Loads and load factors Always examined
Simple explanation: Why dead and imposed loads stay separate
Keep two shopping baskets until their different multipliers are applied.
- Put self-weight and permanent finishes in the dead-load basket.
- Put the specified use load in the imposed-load basket.
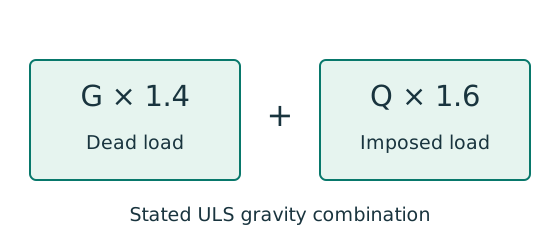
- For this course’s stated gravity combination: .
Remember: That ULS combination is not the imposed-load deflection load.
Source: Chapter 1 pp.8–9 and 13–14; Data File p.1 onward. = characteristic dead load (permanent: self-weight, finishes); = characteristic imposed load (people, furniture); = wind load. The main adverse combinations are:
These assume every load is unfavourable. If dead load helps resist uplift or overturning (favourable), its factor is 1.0, and a favourable imposed load may be left out. The full table also covers cranes, earth pressure, temperature and accidents — use those only when asked; do not force 1.4 / 1.6 onto everything.
If the question says ultimate / factored / design load, it is already factored — do not factor again. If it gives dead and imposed loads separately, factor each once. If self-weight is already included, do not add it; otherwise self-weight = mass per metre × ÷ 1000, as dead load.
Try it yourself. Invented slab: concrete at , finishes and imposed load . Find factored floor intensity.
Reveal answer and reasoning
Concrete: . Dead total . .
Animation labFrom characteristic to design load
Supplement to the original lesson. Enable JavaScript to play, step through calculations and rotate 3D models. The following explanation remains readable offline.
- G is permanent load; Q is imposed load. A surface load and a line load also have different units.
- This illustration uses the course gravity case . Other combinations in the original text retain their own factors.
- For illustrative , change Q and watch each separate contribution.
- Do not carry this ULS total automatically into deflection. Follow the stated SLS load case.
Animation labFrom characteristic to design load
Supplement to the original lesson. Enable JavaScript to play, step through calculations and rotate 3D models. The following explanation remains readable offline.
- G is permanent load; Q is imposed load. A surface load and a line load also have different units.
- This illustration uses the course gravity case . Other combinations in the original text retain their own factors.
- For illustrative , change Q and watch each separate contribution.
- Do not carry this ULS total automatically into deflection. Follow the stated SLS load case.
12. Simple, continuous and semi-continuous design Background
Source: Chapter 1 p.10.Simple design treats beam ends as pinned, so there are no continuity moments at the beam ends; sideways loads go to a bracing system or a rigid core. But note: a beam reaction that is off the column centre still bends the column — “pinned beam” does not mean “no moment in the column” (see columns section 8).
Continuous design uses joints stiff and strong enough to pass moments through. Semi-continuous design explicitly models the real stiffness and strength of the joints (from tests or calibrated analysis); you cannot simply assume how “fixed” a joint is.
Animation labRestraints, sway and imperfections
Supplement to the original lesson. Enable JavaScript to play, step through calculations and rotate 3D models. The following explanation remains readable offline.
- A frame needs a defined path for horizontal force as well as gravity.
- Pinned joints alone do not provide frame moment resistance; sway restraint needs a real structural system.
- Diagonal bracing carries horizontal action through axial forces. This sketch does not assign a numerical frame classification.
- Use the specified imperfection/notional-force model and critical-load criteria. Avoid counting alternative imperfection models twice.
13. P–Δ and P–δ: why deformation adds moment (theory question) Always examined
Simple explanation: Moving sideways gives the load a new lever arm
Once a compressed member moves sideways, the same compression creates extra moment.
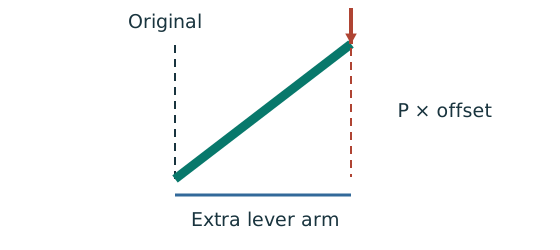
- P–Δ concerns overall frame or storey movement.
- P–δ concerns bowing relative to the member’s end line.
- Amplify only the first-order moments specified by the method.
Remember: Do not amplify a moment that the question already gives as amplified.
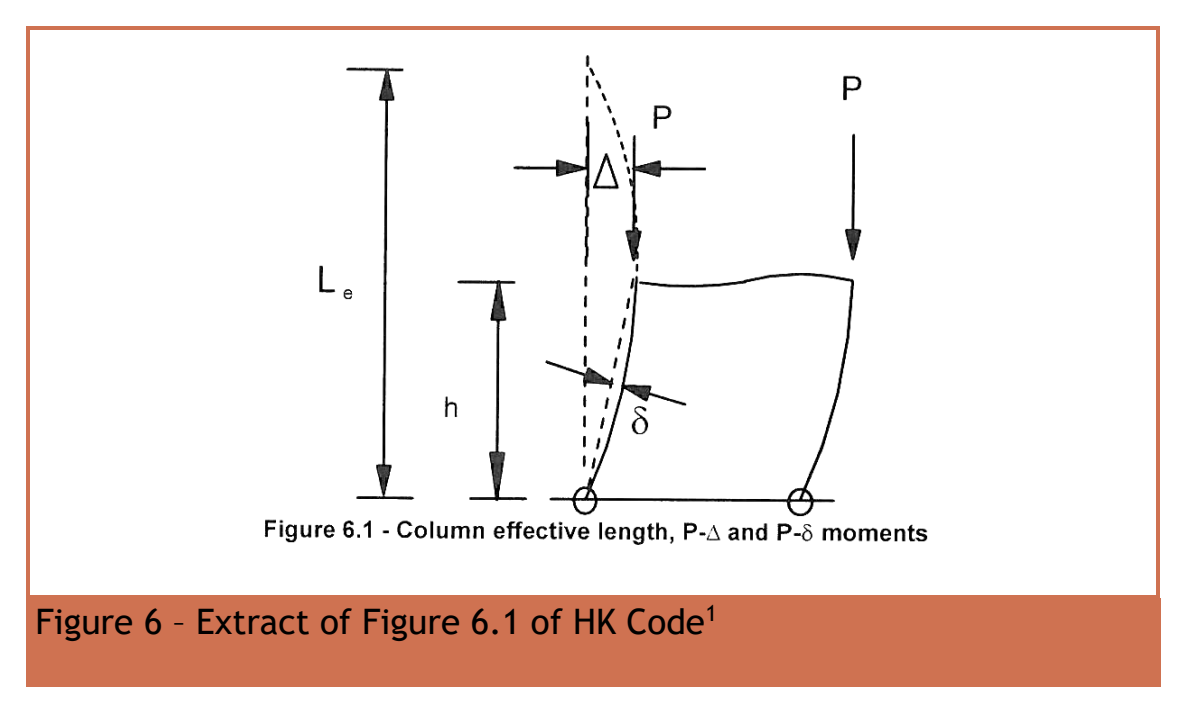
First-order analysis works out equilibrium on the original, undeformed shape. If an axial compression acts through a displaced point, it creates an extra moment . P–Δ goes with frame sway; P–δ with the bowing of a single member. Look at which deformation the sketch shows before naming the effect.
A P–Δ-only second-order analysis includes the frame’s sway but leaves the member bow to be allowed for separately. A P–Δ–δ second-order analysis includes frame deformation, member bow, stiffness change and imperfections. Advanced analysis also includes yielding. The lecture allows first-order results to be used with effective lengths and amplification factors; do not amplify moments that are already amplified.
Model answer: “The analysis establishes equilibrium in the deformed position, including additional moments from axial forces acting through frame sway Δ and member bow δ. Frame/member imperfections and stiffness changes are included in the second-order P–Δ–δ model.”
Concept map: P–Δ and P–δ: why deformation makes the moment bigger
Concept map
P–Δ and P–δ: why deformation makes the moment bigger
One of the most frequent theory questions (3 times in 16 papers). Read from top to bottom: compression plus an offset → the two effects → the snowball → how analysis and design deal with it → the exam answer.
- Cause
- Key idea
- Result
- What changes it
- How design deals with it
- Exam answer
- marks are often lost here
Text version (from cause to result)
Cause
Axial compression
A column carries a large compression . As soon as it does not push straight down the centre line, it adds a moment.
Comes from (upstream)— (a starting point)
Leads to (downstream) P–Δ effect (global) P–δ effect (member)
Cause
The frame sways
Horizontal loads such as wind, or a frame that is not perfectly plumb (design assumes a lean of ), move the top of a storey sideways by relative to its base.
Source: Lecture: global imperfection , or a notional horizontal force of 0.5% of the vertical load.
Comes from (upstream)— (a starting point)
Leads to (downstream) P–Δ effect (global)
Cause
The member bows
No member is perfectly straight (initial bow about to , depending on the buckling curve), and it bows out by between its ends under moment.
Comes from (upstream)— (a starting point)
Leads to (downstream) P–δ effect (member)
Key idea
P–Δ effect (global)
The compression acts through the storey sway and creates an extra moment . It is an effect of the whole frame.
Comes from (upstream) Axial compression The frame sways
Leads to (downstream)A snowball: more bending, more moment How far from instabilityExam answer: definition + both effects + sketch
Key ideaWhere marks are lost
P–δ effect (member)
The compression acts through the member’s own bow and creates an extra moment . It is an effect of one member.
Comes from (upstream) Axial compression The member bows
Leads to (downstream)A snowball: more bending, more momentExam answer: definition + both effects + sketch
Result
A snowball: more bending, more moment
The extra moment bends the member more, the offset grows, and so does the extra moment. Deflections increase, stiffness drops, and in the worst case the frame becomes unstable.
Comes from (upstream) P–Δ effect (global) P–δ effect (member)
Leads to (downstream)Second-order analysis: equilibrium on the deformed shape Amplification factor: add it in one go
How design deals with it
Second-order analysis: equilibrium on the deformed shape
First-order analysis writes equilibrium on the original, undeformed shape and misses the extra moments; second-order analysis writes it on the deformed shape and includes them. A P–Δ–δ analysis also includes member bow and imperfections.
Comes from (upstream)A snowball: more bending, more moment
Leads to (downstream)Four load–displacement curvesExam answer: definition + both effects + sketch
What changes itWhere marks are lost
How far from instability
The elastic critical load factor: how many times the loads must be multiplied before the frame becomes unstable. is non-sway and P–Δ may be simplified; is ultra-sensitive and needs second-order or advanced analysis.
Source: Columns lecture section 5
Comes from (upstream) P–Δ effect (global)
Leads to (downstream) Amplification factor: add it in one go
Exam answer
Four load–displacement curves
First-order elastic: a straight line; second-order elastic: stiffness gradually drops; first-order plastic: reaches a plateau (mechanism); second-order elastic-plastic: a lower peak, then the load falls.
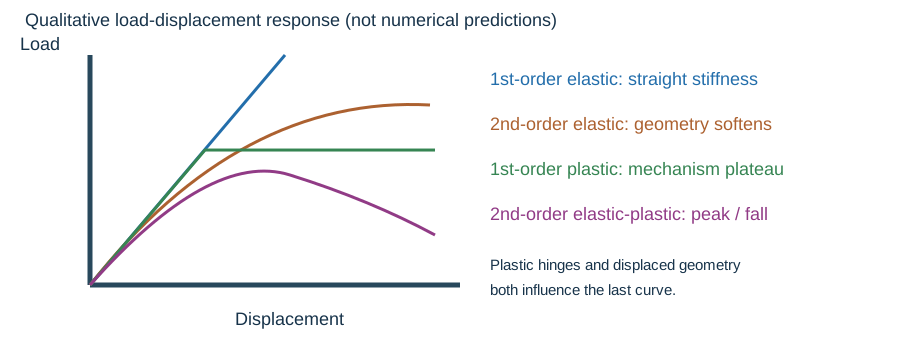
Source: Short theory: four analysis types (asked once)
Comes from (upstream)Second-order analysis: equilibrium on the deformed shape
Leads to (downstream)— (the last step)
How design deals with itWhere marks are lost
Amplification factor: add it in one go
Without a second-order analysis, multiply the first-order moment by an amplification factor to include the extra moment. Exam questions usually give the factor (e.g. 1.1).
Source: How it is used: columns crash course.
Comes from (upstream)A snowball: more bending, more moment How far from instability
Leads to (downstream)— (the last step)
Exam answer
Exam answer: definition + both effects + sketch
Write one definition (equilibrium on the deformed shape), one line each for P–Δ and P–δ, and a sketch: a frame swaying by on the left and a column bowing by on the right.
Comes from (upstream) P–Δ effect (global) P–δ effect (member)Second-order analysis: equilibrium on the deformed shape
Leads to (downstream)— (the last step)
Tour steps
1. The cause: compression plus an offset
Compression alone adds no moment; it must act through an offset. There are two kinds of offset: storey sway or member bow .
In this step Axial compression The frame sways The member bows
2. The two effects
Compression × storey sway = P–Δ (global); compression × member bow = P–δ (member).
In this step P–Δ effect (global) P–δ effect (member)
3. The snowball
Extra moment → more deformation → more extra moment. That is why it cannot be ignored.
In this stepA snowball: more bending, more moment
4. Analysis
First-order analysis cannot see it; second-order analysis works on the deformed shape. The four analysis curves may also be asked on their own.
In this stepSecond-order analysis: equilibrium on the deformed shapeFour load–displacement curves
5. How design deals with it
Use to judge how sensitive the frame is; in calculations multiply the first-order moment by the amplification factor, once only.
In this step How far from instability Amplification factor: add it in one go
6. The exam answer
Definition + P–Δ + P–δ + sketch, about 4 marks. No essay needed.
In this stepExam answer: definition + both effects + sketch
Animation labSeparate P–Δ from P–δ
Supplement to the original lesson. Enable JavaScript to play, step through calculations and rotate 3D models. The following explanation remains readable offline.
- The dashed line marks the original frame position; axial compression acts downwards.
- Global displacement Δ creates the additional moment PΔ.
- Local displacement δ is measured from the line joining the displaced ends, and adds Pδ.
- Follow the original analysis route. Do not amplify an already amplified moment or confuse critical-load factor with member slenderness.
14. Imperfections and the notional horizontal force Background
Source: Chapter 1 pp.12–13 and L1 slide 8.Global imperfection: the course uses an equivalent lean of . Alternatively, apply a notional horizontal force equal to 0.5% of the relevant design vertical load. This models the imperfection; it is not a new gravity load.
A member’s initial bow depends on its buckling curve: give . When you design with effective lengths and amplification factors, these imperfections are already included; do not add an extra imaginary moment.
Animation labRestraints, sway and imperfections
Supplement to the original lesson. Enable JavaScript to play, step through calculations and rotate 3D models. The following explanation remains readable offline.
- A frame needs a defined path for horizontal force as well as gravity.
- Pinned joints alone do not provide frame moment resistance; sway restraint needs a real structural system.
- Diagonal bracing carries horizontal action through axial forces. This sketch does not assign a numerical frame classification.
- Use the specified imperfection/notional-force model and critical-load criteria. Avoid counting alternative imperfection models twice.
15. Strength, overall stability and robustness Background
Source: Chapter 1 pp.14–15.Strength checks compare the demand on members and connections with their resistance. Overall stability prevents overturning, sliding, uplift or uncontrolled sway; bracing, rigid joints, shear walls and cores can provide sideways resistance. Robustness stops accidental local damage spreading into a disproportionate collapse.
Ways to improve robustness: vertical and horizontal ties, resistance to a minimum horizontal load, alternative load paths if a vertical member is removed, and stronger key elements. In an answer, link each measure to what it prevents: e.g. a tie keeps the structure continuous if a support is lost.
Animation labUnderstand an alternative load path
Supplement to the original lesson. Enable JavaScript to play, step through calculations and rotate 3D models. The following explanation remains readable offline.
- Gravity load passes through beams to their columns.
- Local accidental damage interrupts one path. The highlighted column fades to show the interrupted route.
- Ties and continuity can provide another load path, subject to design and deformation capacity.
- This schematic explains the principle; it does not prove that a particular frame survives column removal.
16. Brittle fracture Background
Source: Chapter 1 p.15.Brittle fracture is sudden cracking under tension with very little plastic deformation. Risk factors: welding, stress concentrations, rapid loading, high stress, thick material and low temperature. Prevention: choose a suitable steel quality and thickness and use good welding practice. In an answer, describe the mechanism and list several factors; do not mix it up with fatigue (repeated loading, slow crack growth).
Animation labBrittle fracture versus yielding
Supplement to the original lesson. Enable JavaScript to play, step through calculations and rotate 3D models. The following explanation remains readable offline.
- A notch or weld detail can concentrate tensile stress.
- Steel quality, thickness, low temperature and rapid loading affect brittle-fracture susceptibility.
- Brittle fracture can occur with little plastic warning. It is distinct from progressive fatigue crack growth.
- Follow the required steel quality and welding requirements. The animation is qualitative, without an invented fracture threshold.
17. Deflection limits: pick the right row Always examined
Source: Chapter 1 pp.16–17, Table 5.1; Data File p.2.The course normally checks the extra deflection caused by the unfactored imposed load. Simply supported beams with plaster or brittle finishes: limit ; other beams (not purlins or sheeting rails): ; cantilevers: . Purlins and sheeting rails must suit their cladding.
The full table also has limits for construction stage, composite slabs, frame sway and crane rails. The slide’s is the row for sway at the top of a frame; storey drift is a different row (). In an answer, say which displacement and which load you are checking. Exam questions state the finish condition (usually brittle finishes → ).
Try it yourself. A beam has factored imposed load but the original characteristic imposed load is . Which enters the usual course deflection formula?
Reveal answer and reasoning
. The factor belongs to ULS demand; the serviceability check uses the unfactored imposed load.
Animation labSee stiffness and deflection
Supplement to the original lesson. Enable JavaScript to play, step through calculations and rotate 3D models. The following explanation remains readable offline.
- Use the specified SLS load, span and support arrangement. The demonstrator has a full-span UDL.
- The loaded beam bends; the deformation is exaggerated so its shape can be seen.
- For a simply supported full-span UDL, . Double L with w, E and I unchanged: δ becomes 16 times as large.
- The readout uses , and . Select the finish/support-specific limit from the original table.
18. Design strength depends on thickness Always examined
Simple explanation: S355 does not always mean 355
The grade name is a label; the table supplies the design strength.
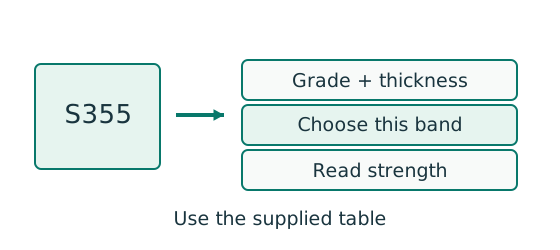
- Identify the thickness that governs this check.
- Read the matching thickness band within the correct grade.
- Use that strength consistently in the calculation.
Remember: For the supplied S355 table, thickness above 16 mm can reduce .
Source: Chapter 1 Tables 3.2/3.3 on pp.18–19; Data File p.1.In the supplied table, the S355 design strength depends on thickness:
| Thickness interval | () |
|---|---|
For beam bending, choose from the flange thickness , as the lecture examples do; for a plate use that plate’s thickness; for web bearing use the web’s . Keep the different “strengths” apart: steel design strength, bolt shear, weld, column compression, LTB bending — same units, different questions.
Try it yourself. Which strength applies to S355 cover plates thick and a main plate thick?
Reveal answer and reasoning
Cover: because . Main: because . Do not use one value just because both say S355.
Animation labRead a table without losing the keys
Supplement to the original lesson. Enable JavaScript to play, step through calculations and rotate 3D models. The following explanation remains readable offline.
- Name the required property: material strength, section property, buckling strength or a moment factor.
- Keep section size, steel grade, thickness band, curve and axis as separate lookup keys.
- , and require different conversion powers. Do not use adjacent columns interchangeably.
- Use bracketing rows within the same valid column. The original page remains the source of all table values.
Animation labRead a table without losing the keys
Supplement to the original lesson. Enable JavaScript to play, step through calculations and rotate 3D models. The following explanation remains readable offline.
- Name the required property: material strength, section property, buckling strength or a moment factor.
- Keep section size, steel grade, thickness band, curve and axis as separate lookup keys.
- , and require different conversion powers. Do not use adjacent columns interchangeably.
- Use bracketing rows within the same valid column. The original page remains the source of all table values.
19. Local buckling and the four classes Always examined
Simple explanation: A thin part can wrinkle first
A thin plate may wrinkle before the whole steel member reaches its intended resistance.
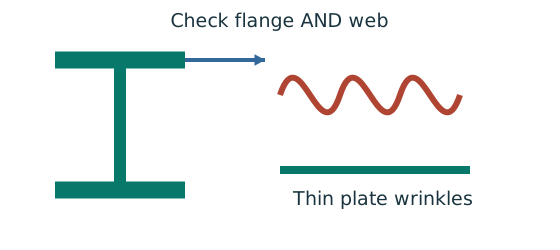
- Check flange and web slenderness using their own definitions.
- Compare each ratio with the correct class limits.
- The less favourable element determines the section class.
Remember: Bending limits and uniform-compression limits are different.
Source: Chapter 1 pp.19–22; Data File p.1.A thin plate can wrinkle locally before the whole member buckles. Classification compares each plate’s width (or depth) ÷ thickness. The worst plate decides the whole section: a Class 2 flange with a Class 3 web → Class 3 overall. When the lecture says “lowest class” it means the worst behaviour, i.e. the highest class number.
| Class | What can be developed? | Exam implication |
|---|---|---|
| 1: plastic | Full plastic moment and enough rotation for a plastic hinge | Plastic analysis permitted where otherwise applicable. |
| 2: compact | Full plastic moment but limited rotation | May use plastic section resistance, not assume redistribution capability. |
| 3: semi-compact | Extreme fibre can reach ; local buckling limits plastic spreading | Use elastic resistance or explicitly permitted effective properties. |
| 4: slender | Local buckling can occur before extreme fibre reaches | Effective/reduced section treatment required; gross Class 1 formulas do not apply. |
For a rolled I/H beam bending about its strong axis, use the Table 7.1 rows “outstand flange, compression due to bending, rolled” and “web, neutral axis at mid-depth”. Flange limits: (Classes 1, 2, 3); web : . The section table already lists and — use them directly; do not use the overall depth in place of the clear web depth .
For a web in compression plus bending (e.g. a column), use the general-web row with , limited to between −1 and +1. The Class 1 limit is but not below . Easy rule: if it is always Class 1. For pure compression the lecture checks flange and web (this only proves it is not slender).
The beam examples also check : it means the web will not buckle in shear, so the simple shear formula applies. It is not the classification limit, and it does not replace the web bearing / buckling checks at a support.
Try it yourself. For S355 with , a rolled beam has and . Find its bending class.
Reveal answer and reasoning
and : flange is Class 2. : web is Class 1. Overall Class 2. The flange controls.
Animation labWhy thin elements buckle locally
Supplement to the original lesson. Enable JavaScript to play, step through calculations and rotate 3D models. The following explanation remains readable offline.
- The flange outstand and web have different widths, thicknesses and edge support conditions.
- A thinner plate can wrinkle locally before the complete member loses stability.
- Class 1 allows plastic rotation; Class 2 reaches plastic resistance; Class 3 reaches elastic resistance; Class 4 requires effective properties.
- Check every relevant compression element with the supplied limits and stress distribution. The deformation shown is qualitative.
Concept map: Local buckling and the four classes: thin plates wrinkle first, so sections are graded
Concept map
Local buckling and the four classes: thin plates wrinkle first, so sections are graded
Classification is not arithmetic for its own sake: it answers “are the plates thick enough to reach full strength before they wrinkle?”. The answer decides whether you may use or only .
- Cause
- Key idea
- Result
- What changes it
- How design deals with it
- Exam answer
- marks are often lost here
Text version (from cause to result)
Cause
Plates in compression
A section is made of plates. In bending the compression flange is squeezed; the web is bent (and in a column also compressed).
Comes from (upstream)— (a starting point)
Leads to (downstream)Local buckling: thin plates wrinkle
Key idea
Local buckling: thin plates wrinkle
If a plate is too thin it wrinkles locally before it fully yields, so the section cannot reach its full strength. This is different from the whole member buckling.
Comes from (upstream)Plates in compression
Leads to (downstream), Width-to-thickness ratios Stronger steel, stricter limits
What changes itWhere marks are lost
, Width-to-thickness ratios
The larger the ratio, the thinner the plate and the easier it wrinkles. The section table already lists them.
Comes from (upstream)Local buckling: thin plates wrinkle
Leads to (downstream)Class 1 plasticClass 2 compactClass 3 semi-compactClass 4 slender
What changes it
Stronger steel, stricter limits
. Stronger steel must reach a higher stress before wrinkling, so it needs chunkier plates; the limits are multiplied by to tighten them.
Comes from (upstream)Local buckling: thin plates wrinkle
Leads to (downstream)Class 1 plasticClass 2 compactClass 3 semi-compactClass 4 slender
Result
Class 1 plastic
Reaches the full plastic moment with enough rotation to form a plastic hinge. I-section flange , web .
Comes from (upstream), Width-to-thickness ratios Stronger steel, stricter limits
Leads to (downstream)The worst plate decides
Result
Class 2 compact
Reaches the full plastic moment but with limited rotation. Flange within , web within .
Comes from (upstream), Width-to-thickness ratios Stronger steel, stricter limits
Leads to (downstream)The worst plate decides
Result
Class 3 semi-compact
Only reaches the elastic moment (first yield at the edge); it wrinkles before the plastic moment. Flange within , web within .
Comes from (upstream), Width-to-thickness ratios Stronger steel, stricter limits
Leads to (downstream)The worst plate decides
Result
Class 4 slender
Wrinkles before yielding; effective (reduced) properties are needed. The usual exam UB/UC sections are never Class 4.
Comes from (upstream), Width-to-thickness ratios Stronger steel, stricter limits
Leads to (downstream)The worst plate decides
How design deals with itWhere marks are lost
The worst plate decides
Classify the flange and the web separately and take the higher (worse) class. E.g. flange Class 2, web Class 3 → Class 3.
Comes from (upstream)Class 1 plasticClass 2 compactClass 3 semi-compactClass 4 slender
Leads to (downstream)Decides which moment resistance
How design deals with it
Decides which moment resistance
Class 1 or 2 → ; Class 3 → ; Class 4 → effective section. The LTB also depends on the class. Worked numbers: classification map.
Comes from (upstream)The worst plate decides
Leads to (downstream)Theory: purpose of classification
Exam answer
Theory: purpose of classification
One line of purpose (width-to-thickness limits decide whether local buckling stops the section reaching its yield or plastic resistance), then one line for each of the four classes.
Comes from (upstream)Decides which moment resistance
Leads to (downstream)— (the last step)
Tour steps
1. Thin plates in compression wrinkle
A section is made of plates; a thin plate in compression wrinkles locally (local buckling).
In this stepPlates in compressionLocal buckling: thin plates wrinkle
2. What makes it wrinkle more easily?
A larger width-to-thickness ratio; and stronger steel tightens the limits ().
In this step, Width-to-thickness ratios Stronger steel, stricter limits
3. The four classes
From “can form a plastic hinge” to “wrinkles before yield”, each class is worse than the one before.
In this stepClass 1 plasticClass 2 compactClass 3 semi-compactClass 4 slender
4. The whole section takes the worst
Compare flange and web separately and take the worse; that decides between and .
In this stepThe worst plate decidesDecides which moment resistance
5. The theory answer
One line of purpose + one line per class.
In this stepTheory: purpose of classification
Animation labWhy thin elements buckle locally
Supplement to the original lesson. Enable JavaScript to play, step through calculations and rotate 3D models. The following explanation remains readable offline.
- The flange outstand and web have different widths, thicknesses and edge support conditions.
- A thinner plate can wrinkle locally before the complete member loses stability.
- Class 1 allows plastic rotation; Class 2 reaches plastic resistance; Class 3 reaches elastic resistance; Class 4 requires effective properties.
- Check every relevant compression element with the supplied limits and stress distribution. The deformation shown is qualitative.
20. Which code the course uses: do not mix Background
The lecture uses the Hong Kong Code of Practice for the Structural Use of Steel 2011 for calculations; the syllabus lists the 2011 (2023 edition). The Data File tables come from the 2011 Code, and the section properties from an SCI / BS 5950 design guide. All exercises on this site follow those formulas, tables and symbols.
Lecture pp.23–26 introduce BS 5950, GB 50017, Eurocode 3, AS 4100 and AISC and compare their symbols. The Eurocode family: EN 1990 basis, 1991 actions, 1992 concrete, 1993 steel, 1994 composite, 1995 timber, 1996 masonry, 1997 geotechnical, 1998 earthquake, 1999 aluminium. Each country can add a National Annex to set some parameters.
| Meaning | Course HK notation | Eurocode notation in the lecture |
|---|---|---|
| Major cross-section axis | ||
| Minor cross-section axis | ||
| Along member | Not labelled in this course table | |
| Elastic section modulus | ||
| Plastic section modulus | ||
| Axial action | ||
| Design yield stress | ||
| Column compressive strength | ||
| LTB bending strength |
Eurocode calls dead load a permanent action and imposed and wind loads variable actions, with combinations such as and plus combination factors — an overview only; do not use them in HK-code calculations. (The p.26 label “Wrapping Index” is a typo for warping.)
Animation labRead a table without losing the keys
Supplement to the original lesson. Enable JavaScript to play, step through calculations and rotate 3D models. The following explanation remains readable offline.
- Name the required property: material strength, section property, buckling strength or a moment factor.
- Keep section size, steel grade, thickness band, curve and axis as separate lookup keys.
- , and require different conversion powers. Do not use adjacent columns interchangeably.
- Use bracketing rows within the same valid column. The original page remains the source of all table values.
Appendix: Eurocode combination-factor arithmetic Background
Source: Chapter 1 p.25, Table 11.This comparison assumes a combination factor for wind and for imposed load, each multiplied by the load factor 1.5 (both have no units).
Accompanying wind coefficient
Animation labRearrange a capacity equation
Supplement to the original lesson. Enable JavaScript to play, step through calculations and rotate 3D models. The following explanation remains readable offline.
- For , P is force, p is stress and A is area. Here we want A.
- Divide both sides by the same non-zero stress p.
- The p on the right cancels, leaving .
- gives . This is required area, not a selected section or a complete design check.
Accompanying imposed coefficient
Animation labRearrange a capacity equation
Supplement to the original lesson. Enable JavaScript to play, step through calculations and rotate 3D models. The following explanation remains readable offline.
- For , P is force, p is stress and A is area. Here we want A.
- Divide both sides by the same non-zero stress p.
- The p on the right cancels, leaving .
- gives . This is required area, not a selected section or a complete design check.
So the two illustrative combinations contain and . They are not unfactored loads and not HK-code factors. For HK floor questions go back to .
Try it yourself. Under those illustrative assumptions only, what accompanies a wind action?
Reveal answer and reasoning
. This answer belongs to the lecture’s Eurocode comparison, not the HK worked-example loading method.
Animation labRearrange a capacity equation
Supplement to the original lesson. Enable JavaScript to play, step through calculations and rotate 3D models. The following explanation remains readable offline.
- For , P is force, p is stress and A is area. Here we want A.
- Divide both sides by the same non-zero stress p.
- The p on the right cancels, leaving .
- gives . This is required area, not a selected section or a complete design check.
Animation labRearrange a capacity equation
Supplement to the original lesson. Enable JavaScript to play, step through calculations and rotate 3D models. The following explanation remains readable offline.
- For , P is force, p is stress and A is area. Here we want A.
- Divide both sides by the same non-zero stress p.
- The p on the right cancels, leaving .
- gives . This is required area, not a selected section or a complete design check.
Practise this chapter: tutorials, assignments and past-paper answers →
Recent-paper practice for this chapter
- 2024 PTE · Compulsory floor beams
- 2023 FT/PTD · 2023 AQ1 — floor beams and fire protection
- 2023 PTE · Compulsory floor beams
- 2022 FT/PTDR · 2022 AQ1 — floor beams and fire protection