Tutorial 3 Q2: fully restrained floor beams, including local web checks
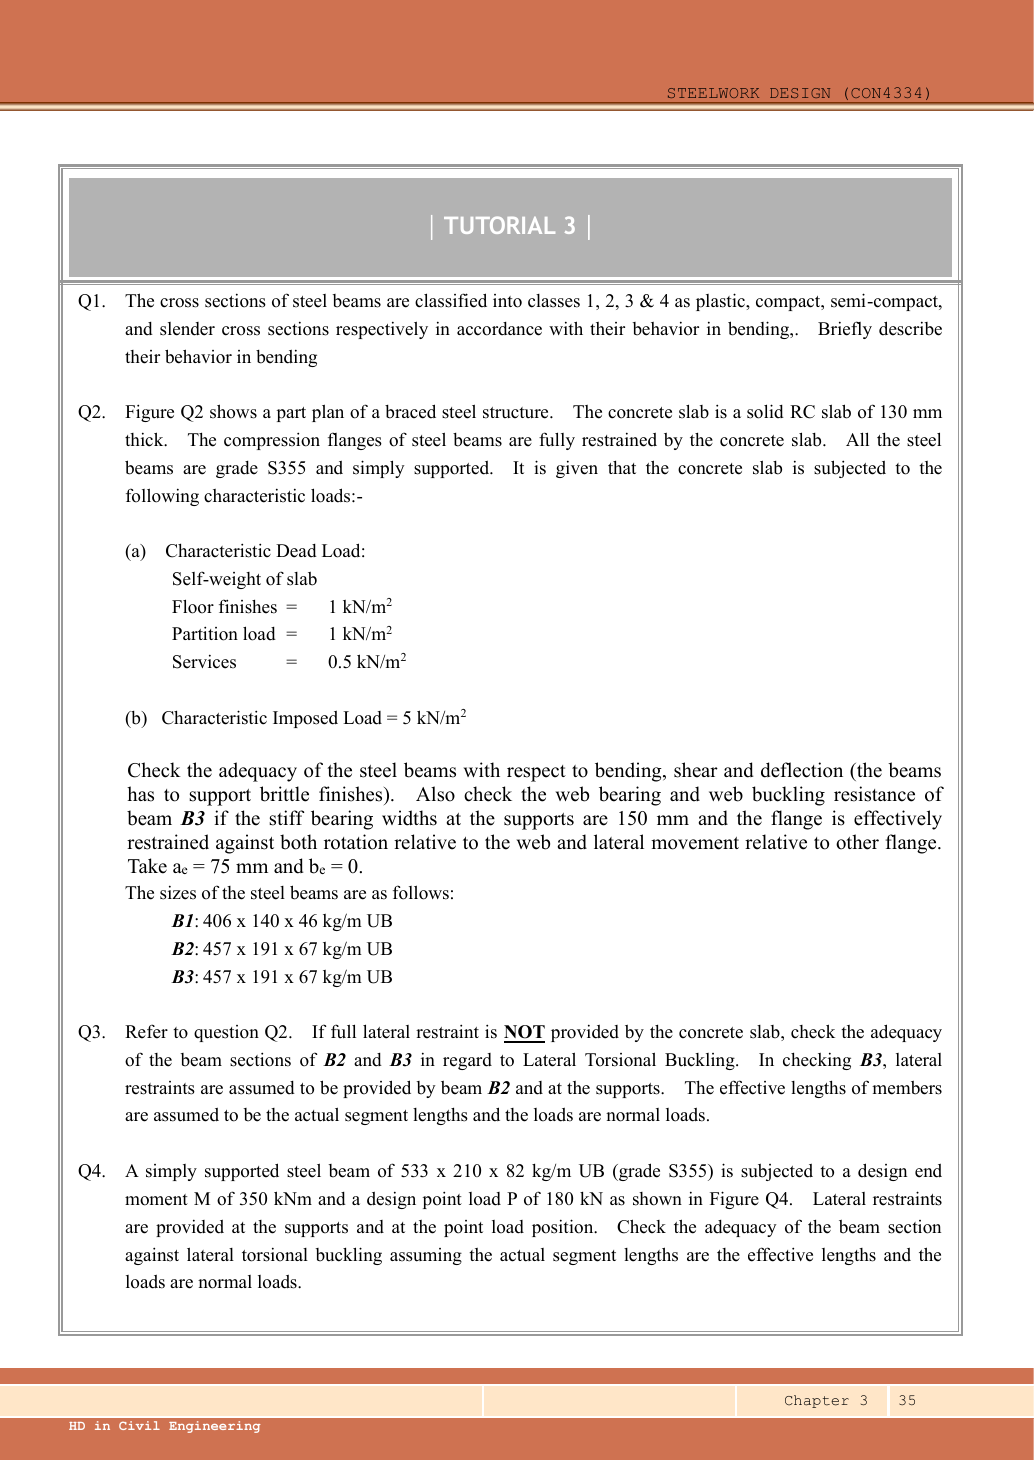
Check B1, B2 and B3 for bending, shear and imposed-load deflection with brittle finishes. Also check B3 support web bearing and web buckling with the given stiff bearing and local restraints.
Original source: LectureNotes/Ch 3_Beam.pdf — p. 35, p. 36.
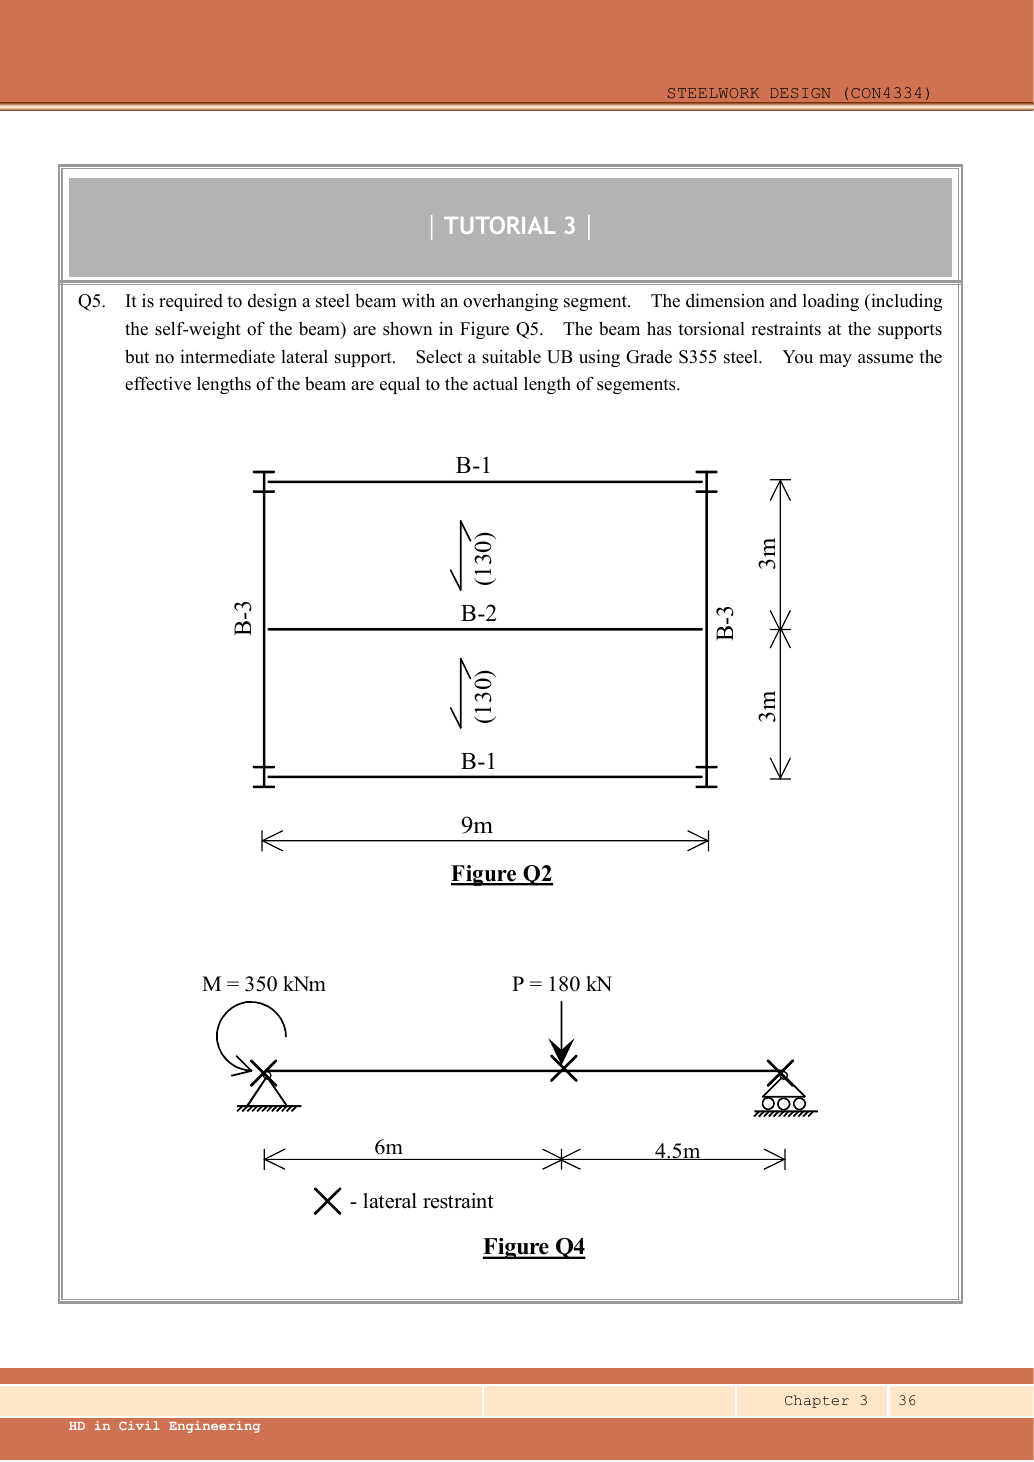
A given value comes from the question or diagram.
A lookup value comes from the named table.
A calculated value follows from the working.
Each assumption is stated where the calculation needs it.
Known information, diagram labels and unknowns
A concentrated force spreads into the web
Check local web resistance at a support or concentrated load, even if overall beam strength passes.
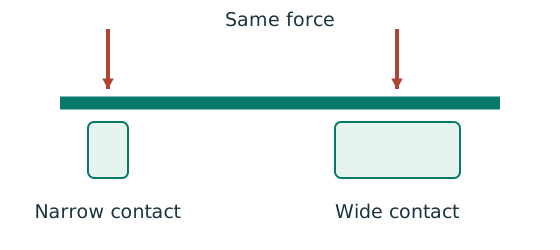
Prediction, then explanation. A longer valid stiff-bearing length can spread the same force over more web. A flexible contact is not automatically stiff bearing.
Match the actual bearing geometry to its source sketch. Use that sketch’s dimensions and permitted spread to calculate the resisting region.
b₁ is stiff-bearing length in mm. Web thickness and applicable design strength enter the prescribed local resistance equation.
Scope. End and interior cases can differ. A lateral-restraint symbol does not provide a bearing length or a load-introduction detail.
Check and takeaway. If bearing geometry is missing, give the applicable symbolic check and state the missing input. Do not borrow another example’s dimensions.
A safe beam can still sag too far
Check whether the beam displacement exceeds the permitted service limit.
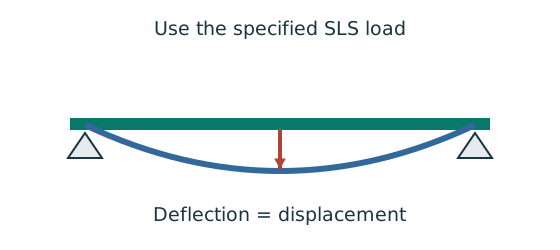
Prediction, then explanation. For the same UDL and stiffness, doubling span multiplies deflection by sixteen. Doubling I halves deflection.
Load bends each beam segment. The curvature accumulates along the span. Material stiffness E and geometric stiffness I resist that deformation.
Use w in N/mm, L in mm, E in N/mm² and I in mm⁴. The resulting midspan deflection is in mm.
Scope. The formula assumes a prismatic, simply supported, linear-elastic beam with full-span UDL. Use the stated service load and deflection limit.
Check and takeaway. A higher yield grade does not automatically increase E. Passing a strength check therefore does not prove acceptable deflection.
Follow one strip of floor
An area load must become a beam load before beam reactions can be calculated.
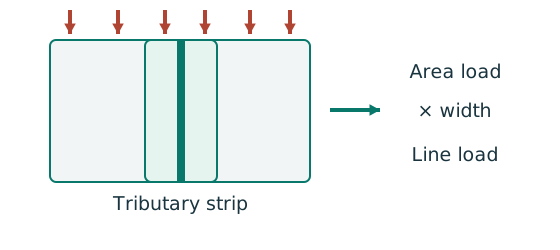
Prediction, then explanation. At fixed area load, twice the tributary width gives twice the line load. An end reaction remains a concentrated force.
Consider one metre along the beam. The associated floor area is b square metres. Multiply area load by that width.
q is area load in kN/m²; b is tributary width in m; w is line load in kN/m.
Scope. Determine b from slab spanning and supports. Add beam self-weight separately. A secondary-beam reaction is not automatically a UDL.
Check and takeaway. Illustration: . The width cancels one length unit.
Apply the reasoning to this section’s data and conditions
| Given or adopted input | Exact origin |
|---|---|
| Floor geometry | FigureQ2: each horizontal B1/B2 spans ; vertical B3 spans . Slab spans vertically between horizontal beams. |
| Tributary widths | Top/bottom B1 takes half of one slab bay=. Middle B2 takes from each side=. |
| Slab thickness | The parenthesised in each slab bay denotes RC slab. It is not a load intensity. |
| Surface loads | Q2 text: finishes , partitions , services , imposed , all . |
| Members | B1 UB; B2 and B3 UB; S355, simple supports and full compression-flange restraint for Q2. |
| Additional B3 support data | Stiff bearing , aₑ75 mm, bₑ0. Both local flange restraints explicitly given. |
| Table mass for self-weight | kg/m and from Data File p.9; multiply by the assumed for this numerical demonstration. |
Keep (concrete unit weight, ) and (acceleration, ) symbolic until supplied.
These equations are the source-supported general solution for the missing inputs:
Why this method applies
Use the same mechanism: A safe beam can still sag too far. For the same UDL and stiffness, doubling span multiplies deflection by sixteen. Doubling I halves deflection.
Vertical bending can trigger sideways motion
A beam has enough local bending resistance. Check whether its compression flange can move sideways and twist.
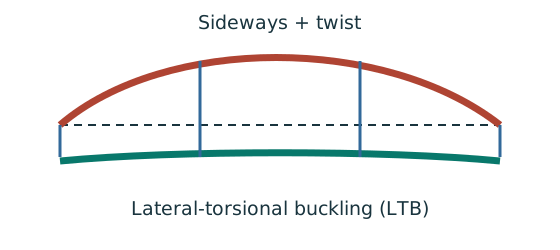
Prediction, then explanation. Adding a valid lateral restraint shortens a stability segment. It need not change the beam’s vertical reaction or moment diagram.
Identify the compressed flange and effective restraints. Calculate the specified slenderness, read buckling strength and compare resistance with the segment demand.
LE and ry use the same length unit. pb uses N/mm²; Sx uses mm³; Mb uses N·mm. mLT is dimensionless.
Scope. Use the specified section class, effective-length branch and loading condition. Load height alone does not prove a destabilizing case.
Check and takeaway. Removing a lateral restraint requires a new segment stability check. The old shorter-segment result cannot establish the longer segment’s adequacy.
Apply the reasoning to this section’s data and conditions
Follow load paths before choosing formulas.
Both B1 and B2 carry a floor UDL; B3 receives the central B2 end reaction plus its own weight.
B1 end reactions are located at B3’s supports, so they increase column/joint reactions but not B3’s span bending.
Full slab restraint suppresses LTB for Q2.
However, not shear, deflection or local web failure.
1. Convert slab thickness and collect surface loads
Keep load categories separate
A floor carries permanent material and changing occupancy loads. Find the design load for the stated check.
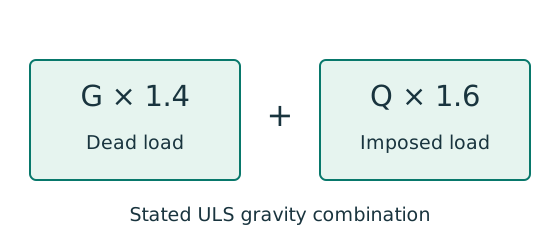
Prediction, then explanation. Increasing imposed load changes its own term. It does not change the dead-load factor or the steel stiffness.
First convert mass to weight where required. Next collect G and Q in compatible units. Apply the combination specified by the course problem.
G is characteristic dead load; Q is characteristic imposed load. Wu is the design load for this course gravity combination.
Scope. This combination is not universal. Use the specified service load for deflection and the stated factors for other standards or cases.
Check and takeaway. Illustration: G = 10 kN and Q = 5 kN give 22 kN. Factoring their sum by one guessed factor loses the distinction.
Change the ruler, keep the quantity
A section table uses centimetres, but the strength calculation uses millimetres. The numbers must describe the same section.
Prediction, then explanation. Would every property increase by ten? No. The exponent determines how many factors of ten are needed.
First identify the physical quantity. Next convert each length factor. Keep force and length conversions separate when converting a moment.
Here n is the length exponent: 2 for area, 3 for section modulus and 4 for second moment of area.
Scope. Changing units changes neither the load nor the section. A conversion factor cannot repair a formula for the wrong physical quantity.
Check and takeaway. Illustration: . The fourth power belongs to the unit, not the number 2.
Apply the reasoning to this section’s data and conditions
Physical interpretation: How a floor load reaches a beam
Each beam collects the load from its own strip of floor.
Sketch, not to scale; use the original dimensions.
- Find the tributary width from the actual plan.
- Area load × tributary width gives load per beam length.
- A supporting beam receives the other beam’s end reaction.
Remember: A reaction becomes a point load, not automatically a UDL.
Self-weight is a dead load.
Therefore, its factor is applied in the next lines.
The imposed-only serviceability calculation does not use either strength factor.
Mechanism detailsFrom characteristic to design load
The complete mechanism is explained below.
Read each stage together with its stated conditions; playback and interaction are not required.
G is permanent load; Q is imposed load.
A surface load and a line load also have different units.
This illustration uses the course gravity case .
Other combinations in the original text retain their own factors.
- For illustrative , the separate load contributions show what changes when Q increases.
Do not carry this ULS total automatically into deflection.
Follow the stated SLS load case.
2. Edge beam B1: loads, actions, section and deflection
Use the same mechanism: Follow one strip of floor. At fixed area load, twice the tributary width gives twice the line load. An end reaction remains a concentrated force.
Use the same mechanism: Keep load categories separate. Increasing imposed load changes its own term. It does not change the dead-load factor or the steel stiffness.
Balance the isolated beam
Find the two vertical reactions before calculating internal shear or moment.
Prediction, then explanation. Move the same load toward B. Reaction B increases because the load has a larger moment arm about A.
Take moments about A. Reaction A has zero lever arm there. Then use vertical force balance to find reaction A.
P, RA and RB are forces in kN. L is support spacing and a is load position, both in m.
Scope. These expressions describe one point load on a simply supported beam. Add other loads through equilibrium; keep their actual positions.
Check and takeaway. Illustration: P = 60 kN, L = 6 m and a = 2 m give RB = 20 kN and RA = 40 kN.
Apply the reasoning to this section’s data and conditions
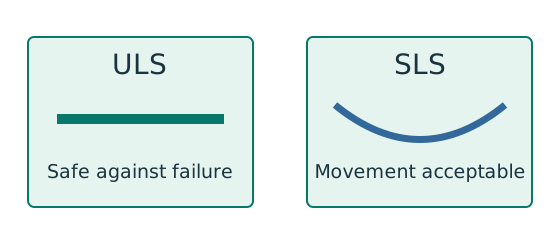
Physical interpretation: Strong enough and stiff enough are two questions
A shelf can avoid breaking yet still sag too much.
Sketch, not to scale; use the original dimensions.
- ULS checks safety against the relevant failure modes.
- SLS checks the specified everyday-use limit.
- Use the load case required for each check.
Remember: Check deflection separately after checking bending resistance.
The two checks use different limits.
Lookup: Data File pp.9–10, exact UB row.
Dimensions on p.9; properties on p.10.
is overall depth.
is the clear web depth between root fillets, not the nominal designation.
| Property | Lookup value / conversion |
|---|---|
| Dimensions | D403.2, web t 6.8, flange T11.2, root r 10.2, clear d 360.4, all |
| Local ratios | ;。 |
| Major-axis properties | ; ; . |
| LTB properties | ; ; torsional index . |
Deflection uses imposed UDL , , and .
The simply supported UDL formula follows by integrating the curvature and relationship with zero displacement at both supports.
Mechanism detailsFollow the floor load in 3D
The complete mechanism is explained below.
Read each stage together with its stated conditions; playback and interaction are not required.
The floor carries pressure in .
The highlighted strip belongs to one secondary beam.
Multiply pressure by tributary width: .
The illustration uses .
- A primary beam receives the secondary beam reaction at their connection, not a new full-span UDL.
Trace reactions down to columns and foundations.
Count each loaded area once.
3. Interior beam B2: twice the floor tributary width
Use the same mechanism: Follow one strip of floor. At fixed area load, twice the tributary width gives twice the line load. An end reaction remains a concentrated force.
Use the same mechanism: Keep load categories separate. Increasing imposed load changes its own term. It does not change the dead-load factor or the steel stiffness.
Use the same mechanism: Balance the isolated beam. Move the same load toward B. Reaction B increases because the load has a larger moment arm about A.
Apply the reasoning to this section’s data and conditions
Lookup: Data File pp.9–10, exact UB row.
Dimensions on p.9; properties on p.10.
is overall depth.
is the clear web depth between root fillets, not the nominal designation.
| Property | Lookup value / conversion |
|---|---|
| Dimensions | D453.4, web t 8.5, flange T12.7, root r 10.2, clear d 407.6, all |
| Local ratios | ;。 |
| Major-axis properties | ; ; . |
| LTB properties | ; ; torsional index . |
Each B3 receives one half of B2’s whole load.
Do not use its ultimate reaction in an imposed-only deflection calculation.
Mechanism detailsFollow the floor load in 3D
The complete mechanism is explained below.
Read each stage together with its stated conditions; playback and interaction are not required.
The floor carries pressure in .
The highlighted strip belongs to one secondary beam.
Multiply pressure by tributary width: .
The illustration uses .
- A primary beam receives the secondary beam reaction at their connection, not a new full-span UDL.
Trace reactions down to columns and foundations.
Count each loaded area once.
4. Supporting beam B3: one midpoint reaction plus self-weight
Use the same mechanism: Follow one strip of floor. At fixed area load, twice the tributary width gives twice the line load. An end reaction remains a concentrated force.
Use the same mechanism: Keep load categories separate. Increasing imposed load changes its own term. It does not change the dead-load factor or the steel stiffness.
Use the same mechanism: Balance the isolated beam. Move the same load toward B. Reaction B increases because the load has a larger moment arm about A.
Apply the reasoning to this section’s data and conditions
B3 has the same section as B2.
Therefore, the already demonstrated Class 1 and no-shear-buckling results apply.
At each corner the column additionally receives B1’s end reaction.
That load at a support does not create span moment in B3.
The midspan point-load expression contains .
The point-load expression printed on Data File p.2, , is dimensionally incorrect.
The course example uses .
gives .
Mechanism detailsFollow the floor load in 3D
The complete mechanism is explained below.
Read each stage together with its stated conditions; playback and interaction are not required.
The floor carries pressure in .
The highlighted strip belongs to one secondary beam.
Multiply pressure by tributary width: .
The illustration uses .
- A primary beam receives the secondary beam reaction at their connection, not a new full-span UDL.
Trace reactions down to columns and foundations.
Count each loaded area once.
5. B3 support web bearing
Use the same mechanism: A concentrated force spreads into the web. A longer valid stiff-bearing length can spread the same force over more web. A flexible contact is not automatically stiff bearing.
Apply the reasoning to this section’s data and conditions
Physical interpretation: A concentrated force can hurt one small region
A narrow contact presses much harder locally than the same force spread over a wider contact.
Sketch, not to scale; use the original dimensions.
- Find the actual stiff bearing length and end position.
- Check local crushing and local web buckling separately.
- Use the restraint conditions required by each expression.
Remember: Missing contact dimensions cannot be guessed from drawing scale.
The question supplies stiff bearing, and .
At an end bearing, the course dispersal factor is .
is the flange-plus-root distance.
The local load is the B3 span reaction under this model.
The B1/column corner load-transfer detail is not shown.
If the B1 reaction also enters the same B3 web-bearing zone, a conservative demand is .
This alternative demand is also below the bearing and buckling resistances below.
Do not invent a different actual bearing detail.
Mechanism detailsSpread a concentrated force into the web
The complete mechanism is explained below.
Read each stage together with its stated conditions; playback and interaction are not required.
- A concentrated reaction first enters through the bearing/contact region.
- The flange and root geometry spread the force before it enters the web.
- A wider effective bearing region can reduce local stress for the same force.
End distance, stiff bearing length and restraint conditions must come from the original question.
The illustrated dimensions explain the mechanism.
They do not replace the original question data.
6. B3 support web buckling and conclusion
The loaded web can act as a short strut
A concentrated load can buckle the web instead of crushing it. This requires a separate local check.
Prediction, then explanation. Reduced local restraint can increase the relevant effective length and reduce local buckling resistance.
First calculate the source model’s effective strip and base resistance. Then apply the branch required by local restraint and load position.
Local web effective length is not the beam span or the LTB segment length. Use the symbol definition in the selected local formula.
Scope. The short-strut picture explains a mechanism; it is not a derivation of every coefficient in the supplied web rule.
Check and takeaway. A local bearing pass does not establish a local buckling pass. State both conclusions and any unresolved restraint condition.
Apply the reasoning to this section’s data and conditions
Physical interpretation: What to do when one input is missing
A calculator cannot supply a dimension that the drawing never gave.
Sketch, not to scale; use the original dimensions.
- Separate given values, table values and calculated values.
- Complete the checks whose required inputs are available.
- State the missing input beside the remaining conditional result.
Remember: An illustrative assumption must not become an unstated exam given.
Both local flange restraints specified in the question are present, so no additional reduction is needed. is below 246.986831; even the conservative combined corner demand is below it.
All requested Q2 beam checks pass for the explicitly adopted loading constants.
Mechanism detailsThe web behaves like a short strut
The complete mechanism is explained below.
Read each stage together with its stated conditions; playback and interaction are not required.
- A concentrated force compresses a local region between the flanges.
- The thin web can buckle sideways before local crushing governs.
- The source distinguishes restraint against rotation and relative lateral movement.
Web bearing and web buckling are separate checks.
Select the original expression whose assumptions are satisfied.
Lecturer's answer
| Item | Lecturer's value |
|---|---|
| B1 406×140×46, 9 m | : , , deflection 19.9 mm < 25 mm |
| B2 457×191×67, 9 m | : , , deflection 21.3 mm < 25 mm |
| B3 457×191×67, 6 m | : , , deflection 5.0 mm < 16.7 mm |
| B3 web bearing / buckling | , |
Conclusion: All three beams pass shear, moment and deflection, and B3 passes the web checks (M in kN·m, V in kN).
Source: Lecturer's tutorial solution, Ch 3, pp. 1–6.
Result and concise exam wording
Use the same mechanism: Vertical bending can trigger sideways motion. Adding a valid lateral restraint shortens a stability segment. It need not change the beam’s vertical reaction or moment diagram.
Apply the reasoning to this section’s data and conditions
| Beam | Ultimate / | Imposed / limit | Result |
|---|---|---|---|
| / | / | Pass | |
| / | / | Pass | |
| / | / | Pass |
, ; including tabulated beam weight and using .
Section is Class 1.
B3: , , with local restraint given.
Full slab restraint means Q2 requires no LTB check.
Misconceptions and checks
Use the same mechanism: A safe beam can still sag too far. For the same UDL and stiffness, doubling span multiplies deflection by sixteen. Doubling I halves deflection.
Use the same mechanism: Follow one strip of floor. At fixed area load, twice the tributary width gives twice the line load. An end reaction remains a concentrated force.
Ask two separate design questions
Decide whether the check concerns failure or unacceptable behaviour during use.
Prediction, then explanation. A larger section may improve both results, but a pass on one branch does not prove a pass on the other.
ULS addresses relevant strength and stability failure modes. SLS addresses specified service conditions such as deflection.
δ is the calculated displacement; δlimit is the permitted displacement. Both must use the same length unit.
Scope. Use each check’s own load combination and limit. A strength load factor does not change the physical stiffness.
Check and takeaway. Write separate conclusions for strength, stability and serviceability where requested. A single unexplained “safe” hides those distinctions.
Apply the reasoning to this section’s data and conditions
- The dimension is the B1/B2 span, not B3’s span.
- B2 receives tributary width; B1 receives .
- Do not apply ULS factors in imposed-load deflection.
- Use for a central point, for a UDL.
How the method transfers to a new variant
Use the same mechanism: The loaded web can act as a short strut. Reduced local restraint can increase the relevant effective length and reduce local buckling resistance.
Find which plate buckles first
Before using plastic bending resistance, check whether the flange and web can sustain the required stress distribution.
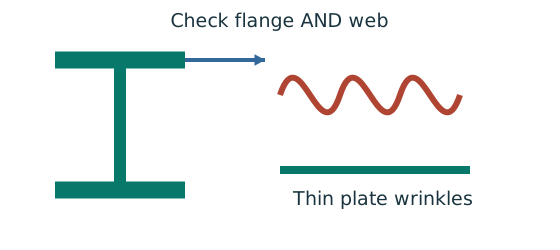
Prediction, then explanation. At fixed width, a thinner plate has a larger width-to-thickness ratio. Local buckling then becomes more restrictive.
Calculate the flange and web ratios separately. Compare each with the limits for its stress condition. The worse class governs.
py is the design yield strength in N/mm². ε is a dimensionless scale used in the supplied classification limits.
Scope. Pure bending and uniform compression use different web limits. Class 2 allows plastic resistance but not the Class 1 rotation capability.
Check and takeaway. A Class 1 web and Class 2 flange give a Class 2 section. Do not average the class numbers.
Use the same mechanism: A safe beam can still sag too far. For the same UDL and stiffness, doubling span multiplies deflection by sixteen. Doubling I halves deflection.
Apply the reasoning to this section’s data and conditions
- Read slab direction, tributary widths, beam spans and restraint positions from the source.
- Separate characteristic dead/imposed loads; factor only strength loads.
- Pass a supporting beam the reaction from the supported beam, not its full load.
- Draw the beam free body, solve reactions and obtain shear/moment ordinates.
- Read the exact section row, classify and check shear before selecting the bending formula.
- Check imposed-load deflection with consistent and .
- Where requested, check bearing/web buckling and each unrestrained segment independently.
Prediction with explained answer
Use the same mechanism: A safe beam can still sag too far. For the same UDL and stiffness, doubling span multiplies deflection by sixteen. Doubling I halves deflection.
Use the same mechanism: Keep load categories separate. Increasing imposed load changes its own term. It does not change the dead-load factor or the steel stiffness.
Apply the reasoning to this section’s data and conditions
Prediction and explained answer.
Invented variant: imposed surface load rises from to .
Which beam first fails its brittle-finish deflection limit?
Answer and reasoning
Deflection increases linearly with imposed load.
B1: ; B2: , fails.
B3: .
Ultimate loads have changed; strength checks must be recalculated separately.
Mechanism detailsSee stiffness and deflection
The complete mechanism is explained below.
Read each stage together with its stated conditions; playback and interaction are not required.
Use the specified SLS load, span and support arrangement.
The demonstrator has a full-span UDL.
The loaded beam bends.
The deformation is exaggerated so its shape can be seen.
For a simply supported full-span UDL, .
Double L with w, E and I unchanged: δ becomes 16 times as large.
The readout uses , and .
Select the finish/support-specific limit from the original table.