Compulsory floor beams: a fixed routine worth 36 marks
Section A is the same kind of question every year: a floor plan, two beam types (B1 and B2) and a concrete slab. Follow the eight steps below and most of the 36 marks are yours.
What does this question test? Always examined
| Part (2024) | Marks | What to do |
|---|---|---|
| (a)(i) | 4 | slab design load (kN/m²) |
| (a)(ii) | 3 | design shear and moment of B1 |
| (a)(iii) | 5 | design shear and moment of B2 |
| (a)(iv) | 4 | section class of both beams |
| (a)(v) | 10 | B1: shear, bending and deflection checks |
| (a)(vi) | 10 | B2: shear, bending and deflection checks |
| (b) | 4 | short theory (see short theory) |
Step zero: read the floor plan Always examined
Find each beam’s span
The length between its two supports. B1 is supported by B2; B2 is supported by columns.
Find the slab span direction
Which parallel beams receive the slab load? Those are the B1 beams.
Work out the tributary width of each B1
An interior B1 takes half the spacing on each side. Spacing 2.5 m → .
Count how many B1 reactions land on B2, and where
B1 on one side → one reaction; B1 on both sides → add the two reactions.
The eight steps Always examined
Slab design load
B1 design line load, shear and moment
B2 loads, shear and moment
B2 receives the B1 end reactions (already factored — do not factor again) plus its own self-weight . With the reaction at midspan:
Classify the sections
Flange thickness → → → compare and → Class 1. Also state (no shear-buckling check needed).
Shear check
“Low shear” check
At the position of maximum moment, if the shear is low and the ordinary moment formula applies. Exam questions are almost always low shear.
Bending check
Deflection check (imposed load only, unfactored)
Understanding map
Compulsory floor beams: load flows from the slab to B1, then to B2
This map is the load path: the slab’s weight lands on B1, and B1’s end reaction becomes the load on B2. Notice the two routes: factored design loads (for strength) and unfactored imposed load (for deflection). The values are from 2024 Q1.
- From the question
- From the tables
- Worked out
- Demand
- Capacity
- Check
- marks are often lost here
Text version (in working order)
From the questionWhere marks are lost
Slab
Slab thickness (in m) × concrete density 24.5 kN/m³, plus finishes 0.4 kN/m².
Needs (upstream)— (a starting value)
Used for (downstream) Dead load per m²
From the question
Imposed load
Imposed load per m² (kN/m²). It takes two routes: × 1.6 for strength, unfactored for deflection.
Needs (upstream)— (a starting value)
Used for (downstream) Design area load Imposed line load (unfactored)
Worked out
Dead load per m²
Slab self-weight plus finishes.
Formula
2024 Q1
Needs (upstream) Slab
Used for (downstream) Design area load
From the question
B1 tributary width
An interior B1 takes half the spacing on each side: . An edge beam takes one side only.
Where it comes from: The beam spacing on the floor plan.
Needs (upstream)— (a starting value)
Used for (downstream) B1 design line load Imposed line load (unfactored)
From the tablesWhere marks are lost
B1 self-weight
Table mass (kg/m) × ÷ 1000 → kN/m. 39.1 kg/m → 0.391 kN/m.
Needs (upstream)— (a starting value)
Used for (downstream) B1 design line load
Demand
Design area load
The answer to (a)(i): dead × 1.4, imposed × 1.6.
Formula
2024 Q1
Needs (upstream) Dead load per m² Imposed load
Used for (downstream) B1 design line load
From the questionWhere marks are lost
B1 span
The length of B1 between its supports (the B2 beams).
Needs (upstream)— (a starting value)
Used for (downstream) B1 shear = end reaction B1 maximum moment Imposed reaction on B2 B1 deflection B1: four checks
From the tables
B2 self-weight
406×140×46 UB: 46 kg/m → 0.46 kN/m.
Needs (upstream)— (a starting value)
Used for (downstream) B2 self-weight (design)
Demand
B1 design line load
The area load times the tributary width becomes load per metre of beam, plus the self-weight × 1.4. (Same as .)
Formula
2024 Q1
Needs (upstream) Design area load B1 tributary width B1 self-weight
Used for (downstream) B1 shear = end reaction B1 maximum moment
Worked outWhere marks are lost
Imposed line load (unfactored)
Deflection uses imposed load only, unfactored. This is where the second route starts.
2024 Q1
Needs (upstream) Imposed load B1 tributary width
Used for (downstream) Imposed reaction on B2 B1 deflection
From the question
B2 span
The length of B2 between its columns.
Needs (upstream)— (a starting value)
Used for (downstream) B2 shear B2 maximum moment B2 deflection B2: four checks
From the tables
Design strength and class
Both flanges are thinner than 16 mm → 355; both beams are Class 1 (part (a)(iv)).
Where it comes from: Core skills: and classification
Needs (upstream)— (a starting value)
Used for (downstream), B1 capacities, B2 capacities
Demand
B1 shear = end reaction
For a simply supported beam the maximum shear is the end reaction. That reaction presses on B2 — the key step of the load path.
Formula
2024 Q1
Needs (upstream) B1 design line load B1 span
Used for (downstream) B2 shear B2 maximum moment B1: four checks
DemandWhere marks are lost
B2 self-weight (design)
B2’s only UDL is its own self-weight × 1.4; the slab load already arrives through B1, so do not count it again.
Formula
2024 Q1
Needs (upstream) B2 self-weight
Used for (downstream) B2 shear B2 maximum moment
Worked out
Imposed reaction on B2
The imposed-load reaction B1 passes to B2, also unfactored.
Formula
2024 Q1
Needs (upstream) Imposed line load (unfactored) B1 span
Used for (downstream) B2 deflection
Demand
B1 maximum moment
For a simply supported beam with a UDL, the maximum moment is at midspan.
Formula
2024 Q1
Needs (upstream) B1 design line load B1 span
Used for (downstream) B1: four checks
DemandWhere marks are lost
B2 shear
B2 receives B1’s reaction at midspan (already factored).
Formula
2024 Q1
Needs (upstream) B1 shear = end reaction B2 self-weight (design) B2 span
Used for (downstream) B2: four checks
Demand
B2 maximum moment
The midspan point load plus the self-weight.
Formula
2024 Q1
Needs (upstream) B1 shear = end reaction B2 self-weight (design) B2 span
Used for (downstream) B2: four checks
DemandWhere marks are lost
B1 deflection
Midspan deflection under the imposed UDL. , .
Formula
2024 Q1
Needs (upstream) Imposed line load (unfactored) B1 span
Used for (downstream) B1: four checks
Demand
B2 deflection
Deflection under the midspan imposed point load. .
Formula
2024 Q1
Needs (upstream) Imposed reaction on B2 B2 span
Used for (downstream) B2: four checks
CapacityWhere marks are lost
, B1 capacities
Shear is carried by the web; the moment capacity is the smaller of and .
Formula
2024 Q1
Needs (upstream) Design strength and class
Used for (downstream) B1: four checks
Capacity
, B2 capacities
The same formulas as B1, with the 406×140×46 UB data.
2024 Q1
Needs (upstream) Design strength and class
Used for (downstream) B2: four checks
Check
B1: four checks
Shear, low shear, bending and deflection — finish each with “… < … ∴ OK”.
2024 Q1
Needs (upstream) B1 shear = end reaction B1 maximum moment, B1 capacities B1 deflection B1 span
Used for (downstream)— (the final conclusion)
Check
B2: four checks
The same four checks; the deflection limit uses B2’s own span.
2024 Q1
Needs (upstream) B2 shear B2 maximum moment, B2 capacities B2 deflection B2 span
Used for (downstream)— (the final conclusion)
Tour steps
1. Read the floor plan
Separate the spans of B1 (secondary) and B2 (main), and work out B1’s tributary width.
In this step B1 tributary width B1 span B2 span
2. (a)(i) Slab design load (4 marks)
, then .
In this step Slab Imposed load Dead load per m² Design area load
3. (a)(ii) B1 load, shear and moment
Area load × tributary width + self-weight → load per metre; then and .
In this step B1 self-weight B1 design line load B1 shear = end reaction B1 maximum moment
4. (a)(iii) B1’s reaction becomes B2’s load
Follow the arrows: flows straight into and . B2 adds only its own self-weight × 1.4.
In this step B2 self-weight B2 self-weight (design) B2 shear B2 maximum moment
5. (a)(iv)–(vi) Capacities
Settle and the class once; both beams use the same formulas for and .
In this step Design strength and class, B1 capacities, B2 capacities
6. Deflection: the unfactored route
Start again from : for B1’s deflection; B1’s imposed reaction for B2’s.
In this step Imposed line load (unfactored) B1 deflection Imposed reaction on B2 B2 deflection
7. Write the conclusions
Each beam needs “… < … ∴ OK” for all four checks. Numbers without a conclusion lose marks.
In this step B1: four checks B2: four checks
Walkthrough: 2024 Q1 Always examined
Given: slab 180 mm, 24.5 kN/m³ concrete, finishes 0.4 kN/m², imposed 4.5 kN/m². B1 = 356×127×39 UB spanning 7 m at 2.5 m spacing. B2 = 406×140×46 UB spanning 5 m, with one B1 reaction at midspan. All S355, , simply supported, fully restrained by the slab, brittle finishes.
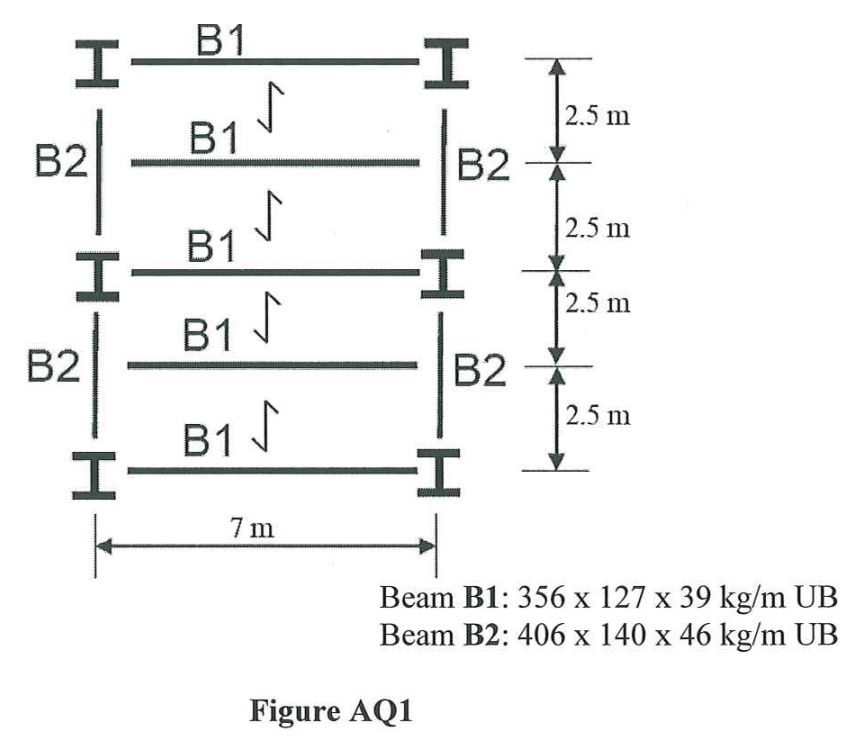
Past-paper walkthrough
(a)(i) Slab design load — 4 marks
Past-paper walkthrough
(a)(ii) B1 shear and moment — 3 marks
Tributary width 2.5 m; self-weight (table mass 39.1 kg/m).
These match the printed 123.8 kN and 216.7 kN·m.
Past-paper walkthrough
(a)(iii) B2 shear and moment — 5 marks
B2 receives at midspan (already factored); self-weight → design value .
Past-paper walkthrough
(a)(iv) Section classes — 4 marks
| B1: 356×127×39 | B2: 406×140×46 | |
|---|---|---|
| flange → | 10.7 mm → 355 | 11.2 mm → 355 |
| 0.880 | 0.880 | |
| flange vs | 5.89 → Class 1 | 6.35 → Class 1 |
| web vs | 47.2 → Class 1 | 53.0 → Class 1 |
| vs | no shear-buckling check | no shear-buckling check |
| Result | Class 1 | Class 1 |
Past-paper walkthrough
(a)(v) B1 checks — 10 marks
Deflection uses imposed load only: . B1 is adequate.
Past-paper walkthrough
(a)(vi) B2 checks — 10 marks
Deflection: the imposed reaction B2 receives is (unfactored).
B2 is adequate.
Full solution with the original drawing: 2024 AQ1 worked answer.
How might the question change? Often examined
| Change | What to do | Seen in |
|---|---|---|
| Two B1 beams join the main beam at midspan from both sides | Main-beam point load = 2 × B1 reaction; deflection also uses 2 × B1 imposed reaction. | 2022, 2023 FT |
| Flange thicker than 16 mm | For S355 use and . | 457×152×82 in 2022 and 2023 FT |
| B1 does not land at midspan | Take moments for the reactions; the maximum moment is under a point load (see core skills §3). | lecture examples |
| You are asked to choose a section | Work out , pick a section with a slightly larger , then check as usual. | lecture examples 1 and 2 |
| Edge beam | Tributary width from one side only: . | — |
| Web bearing / buckling at the support | Not in recent papers; formulas are in the lecture (web bearing). | lecture example 1 |
Where marks are usually lost Always examined
Next: try it yourself
- 2023 PTE Q1: almost the same format as 2024.
- 2023 FT/PTD Q1: two B1 beams join from both sides; thicker flange.
- 2022 Q1: the same idea with different numbers.
- Want the reasons behind it? Beams lecture sections 2–7.