有跨中 restraint 的 B3:完成 LTB 流程 (Restrained Segments)
本題要求:把一般 slenderness ratio 、equivalent slenderness ratio 、查表 strength 及 equivalent moment 分清楚。
直接看步驟 1 ↓這類題目的設計流程:沒有 lateral restraint 的 beam(LTB) →
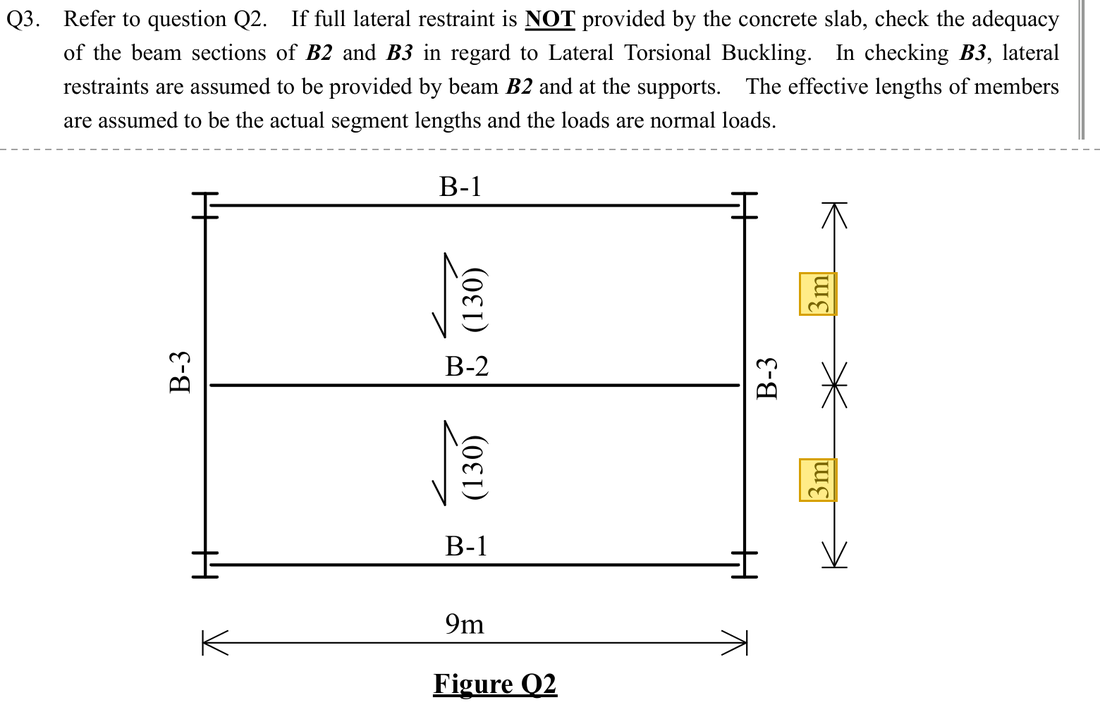
題目重點:B3 是 457×191×67 UB steel beam,span 6 m,兩端和跨中都有 lateral restraint,所以每段只長 3000 mm。本段最大 moment 是 333.144 kNm,要判斷這一段會不會 LTB。
與上一道同類題不同之處:與 B2 同一 section,但跨中多了一個 lateral restraint,沒有扶持的長度由全跨變成半跨;bending moment diagram 也不同,所以 要重新查。
| 已知條件 (Given) | 數值與單位 (Value and Unit) |
|---|---|
| 幾何 | B3(457×191×67 UB,S355)span 6 m,兩端及跨中有 lateral restraint;本段 |
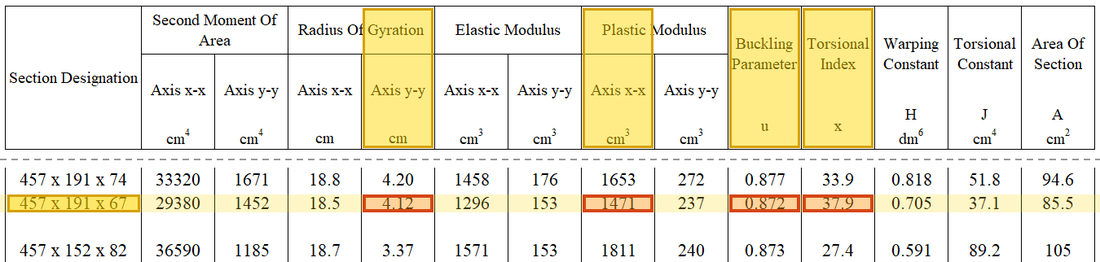
| section 參數 | ;;; |
| 分類與 strength | Class1/2,; |
| moment | (B3 例題);本段, |
黃色底:題目給的數值。下面算式中代入這些數值的位置,也用黃色標示。
橙框:直接從 Data File 查得的數值,即查表截圖中橙框的數值。在表中兩行之間 interpolation 得到的數值屬計算結果,不加框。
解題路線:→→→→→;另一條線由 bending moment diagram 求,再比較需求與 capacity。
這個瀏覽器未能顯示 3D 模型。
moment 令上 flange compression,compression flange 會像 column 一樣向側面 buckling。B2在跨中拉住B3的上 flange,所以每段只有3 m。
- 跨中的最大 moment333.144 kNm
- lateral restraint 之間的一段;
- buckling strength,低於
- LTB(equivalent moment)需求 199.8864 kNmcapacity 373.48 kNm利用率 0.54
- 步驟 1 · 決定分段
為甚麼做這一步:lateral restraint 像從旁邊扶住 beam 的手,compression flange 只能在兩個 restraint 之間向旁邊鼓出去。這段越短,beam 越不容易歪倒。
採相鄰有效 lateral restraint 之間3 m,不採全跨6 m。
這一步的新符號- 、:有效未 restraint 長度、minor axis radius of gyration;須同用mm
- 、:一般及 equivalent slenderness ratio;無單位
力的走向 (Load Path) · load、shear 及 moment綠色是 lateral restraint:兩端的 support 及跨中的B2。上 flange 只能在兩個 restraint 之間 buckling,所以每段的 effective length 是3000 mm。每段的 moment 由一端的零升到另一端的最大值,所以,查得。 - 步驟 2 · 計算
為甚麼做這一步: 把 section 抗扭的幫助變成一個小於 1 的 factor。下一步用它把一般 slenderness ratio 調低,得到 LTB 專用的 slenderness ratio。
先算,再平方;0.25次方在分母,等於整項的負四分之一次方。
這一步的新符號- 、、、:課堂LTB section 及換算參數;無單位
數字來源: 來自 步驟 1。
- 步驟 3 · 換 equivalent slenderness ratio
為甚麼做這一步:一般 slenderness ratio 只描述 beam 向旁邊彎,LTB 還包括扭轉。 把兩者合成一個數;數值越小,beam 越接近可以用盡 section strength。
、及均是本課方法的參數;這一步得到查用的。
- 步驟 4 · 在同一 strength 欄 interpolation
為甚麼做這一步: 是這段 beam 在歪倒扭轉前可承受的彎曲 stress。它比 低,低了的部分就是因為 beam 可能失穩而扣減的 strength。
原表欄,對應257、65對應239 N/mm²;60.86位於兩列之間。
數字來源: 來自 步驟 3。
查表 (Data File) · Data Page 5 · Table 8.3a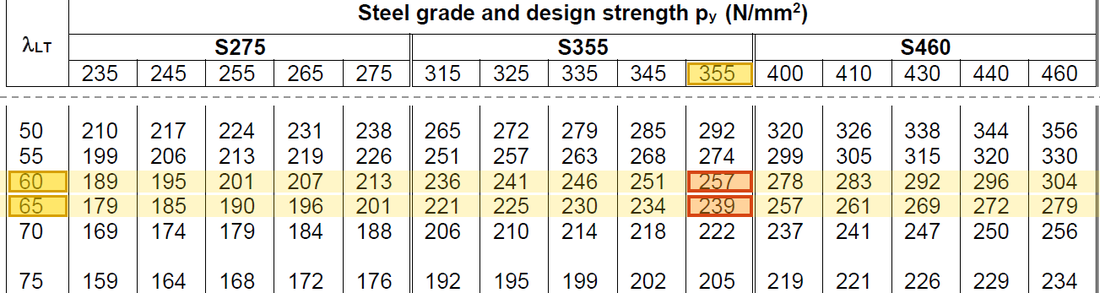
Table 8.3a, 欄: → 257, → 239 N/mm²; interpolation 得 。黃色:題目給的參數及表中的行列橙色:查得的數值,正文中亦加橙框 - 步驟 5 · capacity 單位
為甚麼做這一步: 是這段 beam 在 LTB 前可承受的最大 moment。它是這項校核的 capacity,之後用來與需求比較。
以cm³給出,轉換後可用直接得到kNm。
這一步的新符號- 、:plastic 模數cm³或mm³;LTB capacity kNm
單位:(N/mm²)乘 (cm³):cm³ 要乘 1000 換成 mm³,得 Nmm;Nmm 換成 kNm 要除以 1000000,合起來是除以 1000。
- 步驟 6 · 需求 factor
為甚麼做這一步:這段的 moment 由一端的零升到另一端的最大值,只有一小段受到大 moment,比整段都受最大 moment 安全,所以需求可以調低。
按本段 bending moment diagramβ=0查,不把乘進 capacity。
這一步的新符號- 、:bending moment diagram 比值、equivalent moment factor;無單位
- 、、、:同一 load case 的四分點與最大 moment;kNm
查表 (Data File) · Data Page 6 · Table 8.4a
Table 8.4a: → 。黃色:題目給的參數及表中的行列橙色:查得的數值,正文中亦加橙框 - 步驟 7 · 結論
為甚麼做這一步:需求小於 capacity,表示這段 beam 在 design load 下不會向旁邊歪倒扭轉。section 本身會否彎壞,仍是另一項校核。
199.89小於373.48,本段LTB OK。這不是把原 moment 本身改成199.89,而是本校核使用 equivalent 需求。
計算值的小差異來自中間數字四捨五入。查表必須固定同一欄,不能在不同 strength 欄之間任意內插。
本題符號一覽
| 本題符號 (Symbols) | 意義及單位 (Meaning and Units) |
|---|---|
| 、 | 有效未 restraint 長度、minor axis radius of gyration;須同用mm |
| 、 | 一般及 equivalent slenderness ratio;無單位 |
| 、、、 | 課堂LTB section 及換算參數;無單位 |
| 、 | 設計 yield 及彎曲 buckling strength;N/mm² |
| 、 | plastic 模數cm³或mm³;LTB capacity kNm |
| 、 | bending moment diagram 比值、equivalent moment factor;無單位 |
| 、、、 | 同一 load case 的四分點與最大 moment;kNm |
| 、、、 | interpolation 用的上下兩行 slenderness ratio 及表值 |
影片位置:10月24日 00:30:00 · 10月24日 00:35:00